Using Alpaca
Adding BroadWorks Objects
The User Add and Group Add features will create a new user or group. These features can be combined with Add-ons to enable specific tasks to be performed when creating new users/groups using Alpaca.
User Add
This feature adds a new user with the provided settings to the current BroadWorks Group. This feature is accessible from a Group's Actions tab.
The following information is required when using the User Add Feature.
- User Id
- Provide the User Id for the new user.
- Domain
- Select the appropriate domain from the dropdown list.
- First Name
- The user's first name.
- Last Name
- The user's last name.
- Password
- The user's initial CommPilot password.
Group Add
This feature adds a group to the current BroadWorks Service Provider/Enterprise. This feature is accessible from a Service Provider/Enterprise's Actions tab.
The following information is required when using the Group Add Feature.
- Required information:
- Group Id:
- Provide the Id for the new group.
- Domain:
- Select the domain for the group from the drop-down list of available domains.
- User Limit:
- Provide the group's user limit.
- Group Id:
Deleting BroadWorks Objects
The Delete feature allows you to delete a User, Group, or Service Provider.
User Delete
- This take will delete:
- The user
- The user's devices
- Any devices shared with another user will not be deleted.
- This will not delete:
- The user's phone number
- The phone numbers will be returned to the Group's number pool.
- The user's phone number
Group Delete
- This action will delete:
- The group
- All users contained within the group
- All devices contained within the group.
- This action will not delete:
- The group's assigned phone numbers.
- The phone numbers will be returned to the Service Provider/Enterprise's number pool
- The group's assigned phone numbers.
Service Provider Delete
This feature calls the Group Delete feature to remove the groups contained within the Service Provider/Enterprise.
- This action will:
- Delete the Service Provider/Enterprise
- All groups contained within the Service Provider/Enterprise.
- All users contained within the Service Provider/Enterprise.
- All devices contained within the ServiceProvider/Enterprise
- All phone numbers assigned to the Service Provider/Enterprise
- This action will not delete/remove:
- Any system level settings, like domains.
Searching
BroadWorks Objects
A BroadWorks object search can be performed via the search bar at the top of the page or via the individual searches on a type's tab. e.g cluster, service provider, etc.
The fields that are searchable are:
- All object types
- BroadWorks ID
- BroadWorks Name
- Users
- Phone Number
- Extension
- Email Address
- Devices
- Mac Address
Audit Logs
Audit log searches are available on all pages with either the Latest Changes or History tabs.
The fields that are searchable are:
- Command Type: An example would be "User Call Processing Policy Modified"
- The administrator who performed the action.
- The ID of the object the action was applied to.
Alerts
Alerts can be searched via the Alert page which can be accessed by clicking the Alert History link on the Cluster page.
The fields that are searchable are:
- Cluster
- Summary Message
Tasks
Operations that are long running are handled as background tasks within Alpaca. The Task pages allow their process to be tracked over time and later checked to ascertain details about their completion status. The Task pages can be accessed from the Task button in the header bar. This button is only available to Alpaca Users with the role Alpaca Admin.
Types
Provisioning
- User Add
- User Delete
- Group Add
- Group Delete
Migrations
- Device Migration
- User Migration
- Enterprise Migration
- Group To Enterprise Migration
- User Collection Migration
- User Replace
Reports
- Communication Barring Criteria Report
- Communication Barring Profile Report
- Group Service Assigned Report
- Meet Me Conferencing Report
- User Call Forwarding Always Details Report
- User Details Report
- User Registration Report
- User Service Assigned Report
- User Service Details Report
- User Voice Portal Not Changed Report
System and Other Tasks
- Cluster Cleanup
- Create Voicemail Box
Task Summary Page
After clicking the Tasks button in the header bar, you arrive at the Tasks Summary page. All tasks on this page display their current status, the task type, the location they were started from, and who created the task, There are three sections on the Tasks Summary page:
- Current - This is the task that is currently running. If no tasks are currently running, this section will not appear. Note that only one task can be running at a time.
- Up Next - These are the tasks that are queued up to start.
- Recently Finished - These are the most recent tasks to complete.
To view more information about a task, click the tasks name to be re-directed to the individual task page.
To view the complete tasks history, click the Task History button on the bottom of the page.
Individual Task Page
The individual task page allows you to see more information about a particular task. This is also the page you will be re-directed to after starting any task. Here you can monitor the live tasks logs and download them when the task is complete. You can also view the task process report after it has been completed as well as basic information such as the start time, who started it, and where it was started from. Some tasks have extra information such as "From" and "To".
By clicking the Download Task Archive button you can download the entire task archive or in the case of reports, you can download the report output. Note that the tasks archive cannot be downloaded until the task is complete.
Task History Page
The Task History page allows you search, sort, and find all tasks that have been created. This page can be accessed via the button on the bottom of the Task Summary page.
Alpaca Users
Roles
There are two roles within Alpaca:
- Alpaca Admin: This role has no limitations. An Alpaca Admin can access all pages and perform all tasks.
- BroadWorks System: This is a limited role. This role cannot access any page within the Admin toolbar. All accounts that are registered through the registration page are defaulted to A BroadWorks System role. This can be changed by an Alpaca Admin.
Creating
There are two ways to create an Alpaca User: via the register page and via the Admin > Alpaca Users menu.
Initial
Alpaca comes with a single pre-loaded User with the credentials admin/admin. This user is intended to be used for initial login. Once another Alpaca Admin has been created, it is recommended that the initial account is removed.
Registering
Users can register from the register button on the login page to create a new Alpaca user and associate it automatically with an existing BroadWorks cluster by successfully using a BroadWorks system admin username and password.
Once you complete the form, an email will be sent to the provided email address. In this email, there will be a confirmation link. Click this link or copy and paste it into your browser to confirm registration. Once registration has been confirmed, the user can login with the provided username and password.
Adding an Alpaca Admin manually
This process can only be done by an Alpaca User with the Alpaca Admin role. From the toolbar, navigate to the Admin dropdown and then the Alpaca Users page. Alpaca Users can be added and modified here. To add an Alpaca User, click the Add Alpaca User button.
-
Username: A unique username that will be used to login with. -
Email: The email address to register with. A register confirmation will be sent to this email address. -
Password/Confirm Password: The password that will be used for login. -
BroadWorks Server or Nickname: Dropdown that includes all configured BroadWorks Clusters. Choose one to associate the Alpaca User with. The Alpaca User can be associated with more clusters after initial creation. See BroadWorks Clusters -
BroadWorks Username: The BroadWorks username for the Alpaca User to use to connect to the cluster. -
BroadWorks Password: The password that goes with the Username above. -
Roles: Choose the roles to apply to the Alpaca User.
Modifying / Deleting
Modifying Self
An Alpaca User can modify their own setting by going to the Account dropdown in the toolbar and then Settings. Alpaca Users are not able to delete themselves. Another Alpaca User with the Alpaca Admin role must perform this action.
- Settings: Update basic information such as name and email address.
- Password: Reset your password.
- BroadWorks Credentials: Add, modify, and delete BroadWorks credentials that associate an Alpaca User with a BroadWorks Cluster.
Modify/Deleting Others
Only Alpaca Users with the Alpaca Admin role can modify Users other than themselves. To update another User's settings navigate to the Admin dropdown in the toolbar and then go to Alpaca Users. Click a User to update their name, email address, and roles. To delete a User, click the User and then click the delete button.
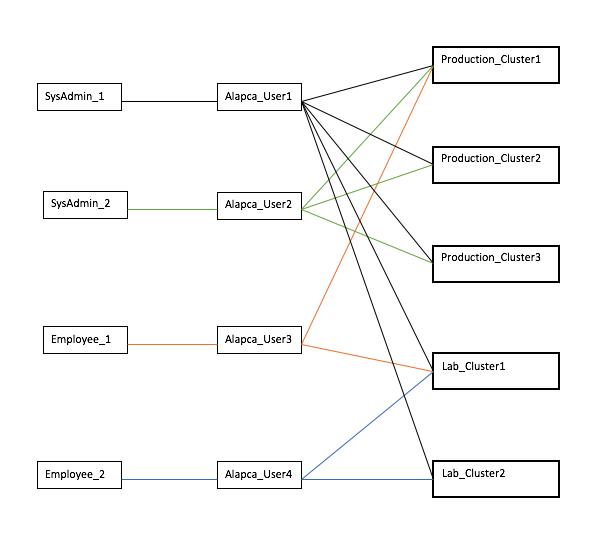
Connecting To BroadWorks
A single Alpaca Admin account can be used to connect to multiple BroadWorks Account. The User will only be able to access Clusters that they have provided credentials for.
Alerting
Alpaca alerting can be configured on two different levels: system and cluster. To modify the system alerting configuration navigate to the alerting tab on the Alpaca dashboard. To modify the cluster level alerting configuration navigate to the alerting tab on the cluster view. All alert types have a severity level that can be used to determine alert importance. If the severity is set to off, no alert will be sent. The types of alerts are described below.
Alerts can currently be sent via email.
License Alerts
License alerts are threshold alerts that are triggered if a particular BroadWorks license exceeds the configured percentage. An alert will be sent if any license passes the threshold.
Blacklisted Admin Alerts
Blacklisted admin alerts are triggered when an admin that matches one of the regular expressions in the list performs an action in BroadWorks.
Password Change Alerts
Password change alerts are triggered anytime a password or passcode is modified.
The following password change alerts can be toggled on or off:
- SIP Authentication Password
- BroadWorks Admin Login Password
- User Web Portal Password
- Voice Portal Passcode
- Other Password - Includes password changes like device credentials changes, trunk group authentication changes, etc.
Unusual Time Change Alerts
Unusual Time Change alerts are triggered when an action is performed in BroadWorks outside of the times configured.
High Volume of Change Alerts
A high volume of change alert is triggered when a large number of actions are performed over the configured amount of time. There are two types of high volume of change alerts: - Admin Changes - Triggered when any admin performs more than the provided actions over the configured period of time. - Cluster Changes - Triggered when the number of actions performed within the provided time is exceeded for the entire cluster.
BroadWorks Connection Failure Alerts
BroadWorks connection failure alerts are triggered when Alpaca can no longer connect to BroadWorks with the provided credentials.
BroadWorks Disconnect Alert
- Trigger condition:
- Triggered when Alpaca loses connection to BroadWorks.
- Clear condition:
- This alert should clear when Alpaca reconnects to BroadWorks.
- Acknowledgment:
- This alert is not automatically acknowledged.
Audit Log Directory Alert
- Trigger condition:
- Audit log directory alerts are triggered when the directory in which Alpaca is configured to find the Audit Logs in is invalid.
- Clear condition:
- This alert will clear once the configured directory is valid.
- Acknowledgment:
- This alert is not automatically acknowledged.
Admin Added Alert
Admin Added Alerts are triggered anytime a BroadWorks admin is added.
The following Admin types can be toggled on or off:
- System Admin
- Service Provider Admin
- Group Admin
- Group Department Admin
Email Notification Configuration
- Types of emails:
- New Alert - Sent when a new alert is triggered.
- Cleared Alert - Sent when an alert is cleared.
- Batched Alert - Sent when multiple alerts are triggered at a similar time. Those alerts will be compiled into one email.
- Email - The email addresses that the alerts are sent to.
- Subject - The subject line of the email.
- Body - The HTML body of the email.
Writing Templates
Alpaca uses Thymeleaf email template engine. Examples can be seen below.
Object UsageA big part of Thymeleaf is that it allows the use of Java objects. The Alpaca object that is available for use in the templates is the alert variable. Note that in the new alert and cleared alert templates, a single Alert is the object that is available. The Batched Alerts templates have a list of alerts in the alerts variable. The variables on the alert object that are available for use are as follows:
-
id- The object's unique id. -
cluster- The cluster the alert belongs to.-
nickname- The human-readable nickname of the cluster.
-
-
mode- The mode of the alert - Historical or Threshold.-
humanName- The human-readable name of the alert mode.
-
-
severity- The severity of the alert at the time of creation.-
humanName- The human-readable name of the alert severity.
-
-
type- The type of the alert.-
humanName- The human-readable name of the alert type.
-
-
idMessage- Unique identifier for this alert type + object id -
summaryMessage- A summary of what the alert is about. -
detailMessage- The full detail of an alert. -
cleared- Whether or not the alert has been cleared. -
clearedDate- The date and time the alert was cleared. -
clearedBy- The user that cleared the alert. -
acknowledged- Whether or not the alert has been acknowledged. -
acknowledgedDate- The date and time the alert was acknowledged. -
acknowledgedBy- The user that acknowledged the alert. -
acknowledgedMessage- The acknowledged message.
<div class="jumbotron">
    <h1 class="display-3"><span th:text="${alert.type}">Alert Type</span> Cleared</h1>
    <p class="lead">This notification is a generated automatic service to you.</p>
    <hr class="my-4"/>
    <p>The following alert was cleared at <span th:text="${alert.clearedDate}">date</span> by
        <span th:text="${alert.clearedBy}">admin</span>.</p>
    <p th:text="${alert.detailMessage}">Alert detail message.</p>
    <p>You do not need to respond to this email.</p>
</div>
<div class="jumbotron">
    <h1 class="display-3"><span th:text="${alert.type.humanName}">Alert Type</span> Notification</h1>
    <p class="lead">This notification is a generated automatic service to you.</p>
    <hr class="my-4"/>
    <p th:text="${alert.detailMessage}">Alert detail message.</p>
    <p>You do not need to respond to this email. If, however, you think that this change may have been made in error or fraudulently, <b>please
        contact us immediately</b></p>
    <p class="lead">
        <a class="btn btn-primary" href="#" role="button">Contact Us</a>
    </p>
</div>
<div class="jumbotron">
    <h1 class="display-3">Notification of <span th:text="${alerts.size()}">#</span> Alpaca Alerts</h1>
    <p class="lead">This notification is a generated automatic service to you.</p>
    <!-- Thymeleaf Loop -->
    <div th:each="alert : ${alerts}">
        <hr class="my-4"/>
        <h4 th:text="*{alert.type.humanName}">Alert Type</h4>
        <p th:text="*{alert.detailMessage}">Detail Message</p>
    </div>
    <p>You do not need to respond to this email. If, however, you think that this change may have been made in error or fraudulently, <b>please
        contact us immediately</b></p>
    <p class="lead">
        <a class="btn btn-primary" href="#" role="button">Contact Us</a>
    </p>
</div>
Communigate Voicemail Wizard
Overview
The Communigate Voicemail Wizard assists in the provisioning of voicemail only Users and their configuration within BroadWorks and Communigate Pro. The wizard collects the basic information as needed and performs a sequence of provisioning steps to create the user.
There are configurable options available in the Alpaca properties.
alpaca:
    communigate:
        communigate-cluster-nickname: "Cluster1"
        communigate-service-provider-id: "Voice_Mail_Only"
        communigate-login-disabled-email: "voip.admin@acme.com"
        communigate-voicemail-d-n-length: 10
-
communigate-cluster-nickname- The nickname of the BroadWorks cluster to associate Communigate with. -
communigate-service-provider-id- This is the Service Provider ID that Users will be created within. -
communigate-login-disabled-email- Where login disabled assistance requests will be sent. -
communigate-voicemail-d-n-length- The required number length for User creation. This is validated by the client.
Procedure
The Communigate Voicemail Wizard can be accessed via the Tools dropdown in the header bar. Note that this will not appear if it is not licensed.
Begin by filling out the settings bar with the information desired to create the user.
- Residential / Commercial - This radio button modifies the Group ID created to prepend "r" for residential or "b" for commercial (business). Setting this to residential also enabled voice-portal auto login.
- Number - The number to be added and assigned to the User.
- Digiport - This controls which SMDI server route is used for the User.
- First Name
- Last Name
- User Limit - The User limit for the created Group. Defaults to 5.
- Web Portal Password - The initial web portal password for the user.
- Voice Portal Passcode - The initial voice portal passcode for the user.
When the settings have been entered click Create to begin the procedure.
The wizard will begin and follow the following process.
- Add the number to the Service Provider
- Create new Group in the Service Provider
- Authorize Services
- Assign Phone Number
- Set Calling Line ID Number
- Modify Group Extension Length
- Set Group Outgoing Calling Plan
- Set Group Password Rules
- Set Group Passcode Rules
- Set Group Voice Portal Settings
- Create User
- Assign Services
- Assign Voice Portal Passcode
- Set Voice Management Options
- Set Advanced Voice Management Options
- Set Message Waiting Indicator Options
- Add Alias
- Add SMDI Route
- Create the mailbox on Communigate Pro Server
The status of the creation will appear in the status log. This is updated every 30 seconds and immediately following completion of the procedure.