Alpaca: Concepts Guide
This guide details how to use Alpaca and its many functions on a day-to-day basis. The following concepts within this guide can be used to aid in the monitoring and manipulation of a BroadWorks System.
Alpaca Users
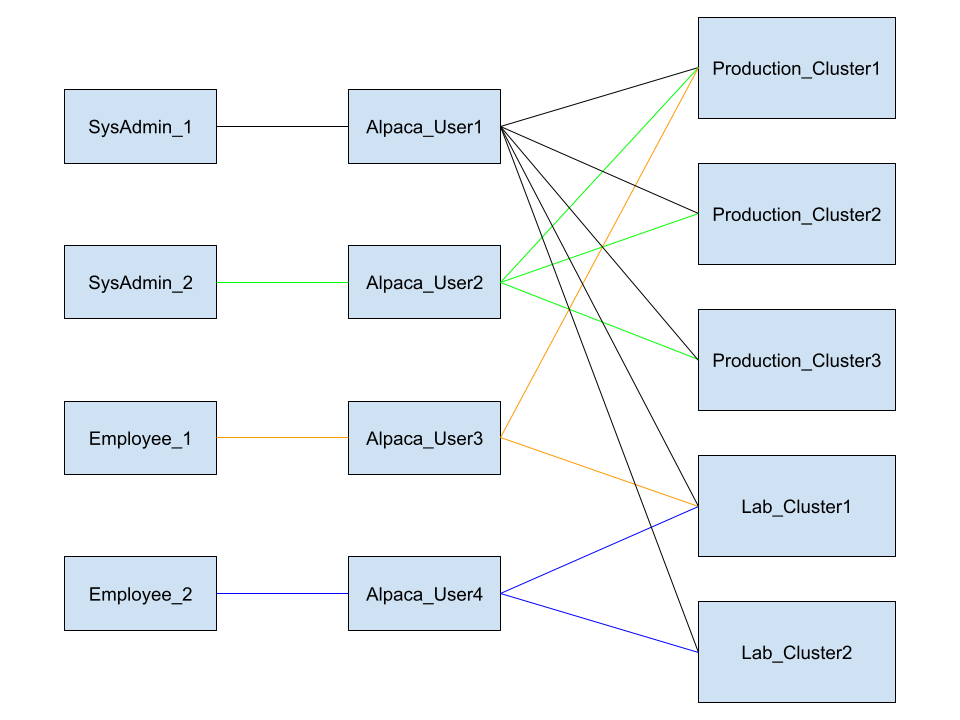
An Alpaca User refers to the account that is used to log in to Alpaca. An Alpaca User is composed of a username and password (used for logging into Alpaca) and a list of BroadWorks Credentials for connecting the User to the BroadWorks Cluster(s) that Alpaca is configured to communicate with. If an Alpaca User does not have credentials for a particular BroadWorks Cluster within Alpaca, then that Alpaca User will not have access to that Cluster.
Supported BroadWorks Login Types
Alpaca currently supports creating Alpaca Users with BroadWorks Credentials of the following BroadWorks login types:
- System
- Group
- Group Department
- User
Roles
Each Alpaca User can be assigned one role. Each role gives the Alpaca User a specific set of authorities that allow the Alpaca User to perform actions. One role can be marked default per user type (System, User, etc.); this is the role that is automatically assigned to new users that are created via self-registration or SSO.
Authorities
The following authorities are available to assign to roles:
- Alpaca Admin: Allows all admin and BroadWorks functions to be performed.
- BroadWorks Admin: Allows all BroadWorks functions to be performed.
- Enterprise Migration: Allows all migrations to be performed.
- Group Migration: Allows Group, Device, and User migrations to be performed.
- Group to Enterprise Migration: Allows Group To Enterprise migration, Group migration, Device migration, and User migration to be performed.
- User Migration: Allows User migrations to be performed.
- Authentication/Randomization: Only allows authentication and randomization functions to be performed.
- SurgeMail: Allows use of the SurgeMail tools.
- Call History: Allows use of the Call History and Call Statistics feature.
- Task Management Admin: Allows all task functions to be performed. Can monitor tasks, pause tasks, and cancel queued tasks.
- Task Management View All Tasks: Can monitor all tasks.
Adding Roles
Roles can be added via the Alpaca Role menu accessed by the admin toolbar.
Once on the Alpaca Role page, click the "Add Alpaca Role" button.
- Role Name: The name of the role.
- Default Role For Login Type: Choose whether to set the role as default for a login type. Cannot be marked default if there is already a role marked as default for the same login type.
- Authorities: Select the authorities to apply to this role.
Click "Save Changes" to complete the addition process.
Modifying / Deleting Roles
Roles can be added via the Alpaca Role menu accessed by the admin toolbar.
Once on the Alpaca Role page, click the role you wish to modify/delete.
Update the fields you wish to change, and click "Save Changes".
To delete a role, click "Delete" instead.
Note that a role cannot be deleted if it is assigned to you or another Alpaca User or a system role.
Initial Alpaca User
Alpaca comes with a single preloaded Admin User. The credentials for this user can be found in the Alpaca
log (/var/log/alpaca/alpaca-server-<BW_VERSION>.log by default) on initial startup. The password will be included in a
line that
begins with Initial Admin Password:. This user is intended to be used for initial login. Once another Alpaca Admin has
been created, it is recommended that the initial account is removed or the password is updated.
Creating Alpaca Users
There are three ways to create an Alpaca User:
- Registration Form.
- The Alpaca Users admin page.
- User created via Single Sign-On.
Registering
Users can register from the register button on the login page to create a new Alpaca user and associate it automatically with an existing BroadWorks cluster by successfully using a BroadWorks system-level admin username and password. Note that non-system BroadWorks credentials can only be used via Single Sign-On with the Advanced Provisioning license.
Once you complete the form, an email will be sent to the provided email address. In this email, there will be a confirmation link. Click this link or copy and paste it into your browser to confirm registration. Once registration has been confirmed, the user can log in with the provided username and password.
Adding an Alpaca Admin manually
This process can only be done by an Alpaca User with the Alpaca Admin role. From the toolbar, navigate to the Admin dropdown and then the Alpaca Users page. Alpaca Users can be added and modified here. To add an Alpaca User, click the Add Alpaca User button.
-
Username: A unique username that will be used to log in. -
Email: The email address for the user. A registration confirmation will be sent to this email address. -
Alpaca Role: Choose the role to apply to the Alpaca User. -
Password/Confirm Password: The password that will be used for login. -
Cluster: Dropdown that includes all configured BroadWorks Clusters. Choose one to associate the Alpaca User with. The Alpaca User can be associated with more clusters after initial creation. -
BroadWorks Username: The BroadWorks username for the Alpaca User to use to connect to the cluster. -
BroadWorks Password: The password associated with the Username above. -
Force Password Reset: Forces the user to change their password upon initial login.
Single Sign-On (SSO)
Users can be registered using single sign-on through OAuth, OAuth2, and SAML2. This process will create a user within Alpaca automatically once authenticated with the SSO server. Alpaca will then associate the user with BroadWorks. For OAuth connections this association will use the email field returned from the OpenID response. For SAML connections this association will use the NameId field returned from the authentication response. The association uses the exact BroadWorks User ID. If an exact match cannot be found in BroadWorks or if there are multiple matches, the User will be prompted by Alpaca to specify which Cluster they should be associated with.
This feature is a part of the Advanced Provisioning License and thus is not available unless that license has been purchased.
Alpaca does not have access to the BroadWorks credentials for the User within this model. Due to this Alpaca needs to be a trusted host in the external authentication access control list on both the BroadWorks XSP and Application server.
- XSP_CLI/Applications/OpenClientServer/ExternalAuthentication/AccessControlList
- AS_CLI/System/NetworkAccessLists/ExtAuth
Multiple SSO backends can be used at one time. See the configuration guide for details on how to configure Alpaca for usage with single sign-on.
When Single Sign-On is enabled and there is only one provider configured, all users who access Alpaca via the normal
login, will be automatically redirected to the provider's login site. To access the normal login, navigate
to <ALPACA_URL>/login/admin.
SAML2
- Single sign on URL: https://{alpaca-root}/login/saml2/sso/{registration-service-name}
- SP Entity ID: https://{alpaca-root}/saml2/service-provider-metadata/{registration-service-name}
Alpaca supports using relying-party request signing. To do this, create a certificate and key pair that is placed within the credentials' directory. The configuration of placement is further described in the configuration guide.
The creation of the key and certificate can be done on the command line via:
openssl req -newkey rsa:2048 -nodes -keyout rp-private.key -x509 -out rp-certificate.cert
OAuth2
- Redirect URL: https://{alpaca-root}/login/oauth2/code/{registration-service-name}
Alpaca User Lockout
An Alpaca User can be locked out (denied access) of their account if any of the following events occur:
- The account has exceeded the configured number of failed login attempts.
- The account has been manually locked by another Alpaca Admin.
A locked out account can be unlocked by any of the following events:
- Another Alpaca Admin resets the locked out accounts password.
- The locked out Alpaca User goes through the "Reset Password" form and successfully resets their password.
- Another Alpaca Admin manually unlocks the account through the panel at Admin -> Alpaca Users. This is not recommended as the Alpaca User's password remains what it was before the account was locked out.
Note: SSO Users cannot be locked out from Alpaca. The SSO Provider will need to handle account lockout.
Password Reset
There are several ways to reset a password within Alpaca.
Reset Password (unknown current password)
- A user can use the "Forgot Password" prompt on the login screen to have a password reset link sent to their configured email.
- An Alpaca Admin can change a User's password by going to Admin > Alpaca Users > Click the Username > Passwords and changing the password.
Reset Password (known password)
- A user can reset their own password by navigating to Account > Settings > Password.
Force Password Reset
An Alpaca Admin can force any non-sso user to reset their password upon next login.
This can be done from two places:
- Admin > Alpaca Users > Edit Pencil > Check "Force Password Reset" > Save
- Admin > Alpaca Users > Click Username > Password
Note that SSO users cannot reset their password and a user cannot force themselves to reset their password.
Modifying / Deleting Alpaca Users
Modifying Self
An Alpaca User can modify their own settings by going to the Account dropdown in the toolbar and then Settings. Alpaca Users are not able to delete themselves. Another Alpaca User with the Alpaca Admin role must perform this action.
- Settings: Update basic information such as name and email address.
- Password: Reset your password.
- BroadWorks Credentials: Add, modify, and delete BroadWorks credentials that associate an Alpaca User with a BroadWorks Cluster.
Modify/Deleting Others
Only Alpaca Users with the Alpaca Admin role can modify Users other than themselves. To update another User's settings navigate to the Admin dropdown in the toolbar and then go to Alpaca Users. Click a User to update their name, email address, roles, password, and BroadWorks credentials. To delete a User, click the User and then click the delete button.
Connecting To BroadWorks
A single Alpaca Admin account can be used to connect to multiple BroadWorks Accounts. The User will only be able to access Clusters that they have provided credentials for. Credentials can be added to an Alpaca User in the Account > Settings > BroadWorks Credentials menu.
Service Interaction
The Alpaca platform consists of a number of connected pieces that allow for high availability and multi-release support for BroadWorks. Each individual service can be run on the same machine or on different machines with connectivity between them. The following section will look at each piece and its appropriate configuration.
Alpaca Gateway
- The Gateway performs load-balancing and routing between the various Alpaca Servers. It load-balances requests without
a specific BroadWorks release specified to all available servers. It also performs release specific routing to
available Alpaca servers based on the
X-BroadWorksheader. - In scenarios with an upstream load balancer, it is expected that requests from the load balancer will be proxied to the Gateway.
- The Gateway responds to HTTP requests on port
8080by default and to HTTPS requests on port8443by default. - The Gateway will register itself with the Eureka service and can be seen as successfully registered in the Eureka web interface.
Alpaca Eureka
- The Eureka service performs service registration. The Alpaca Servers, Gateways, and Eurekas will all register and be able to perform lookups using the Eureka instance table.
- Eureka exposes a web interface that displays registered instances. This is available by default on port
8761.
RabbitMQ
- The RabbitMQ service is a message queueing platform that allows message and event propagation to all Alpaca Servers and connected clients.
- The Alpaca Servers need to be configured to talk to all available RabbitMQ instances and will perform failover as necessary.
- RabbitMQ exposes a web interface that displays the available message queues and interconnected RabbitMQ instances.
This lives on port
15672by default and uses the username and password created during configuration.
MongoDB
- The MongoDB service is the backing database for Alpaca.
- When configured for high availability it requires an odd number of instances to adequately allow for primary nomination and seamless failover.
- By default, it is configured to be accessed on port
27017.
Alpaca Server
- The Alpaca Server provides the web GUI and RESTful API. Each server is BroadWorks release specific and will register itself with the Alpaca Eureka instance to become available from the Gateway.
- Requests from the Gateway will be proxied to the Server on its default port of
8085. - The scheduling system for tasks is performed by a tool called JobRunr. The multi-server support comes from scheduled
events being stored in the distributed database. JobRunr also provides a web interface for monitoring and seeing
scheduled events. By default, this is on port
8001with the username and password as configured in the Alpaca Server configuration. - The Server will perform outbound requests to BroadWorks but will also need internal access to RabbitMQ (
TCP 5672), Eureka (TCP 8671), and MongoDB (TCP 27017) instances.
Service Layout
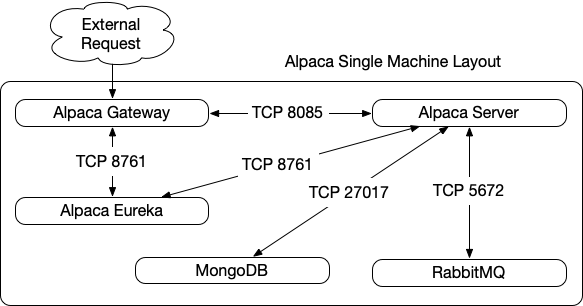
- Alpaca can be configured to have all services on a single machine, or the services can be laid out as a multi machine setup for resilience.
- The single machine layout would look as follows:
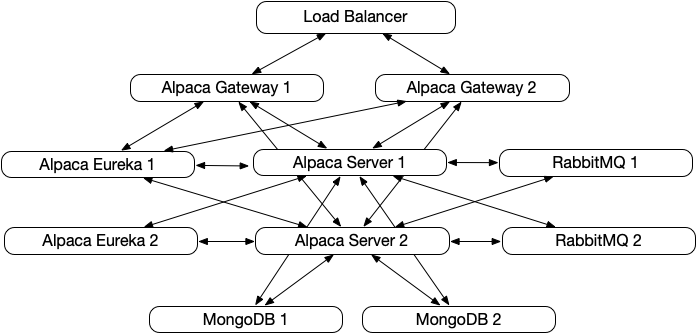
- The individual components can also be separated on separate machines or virtual machines. This configuration allows any piece to be hosted separately. The below image shows the connections between the various pieces as separated.
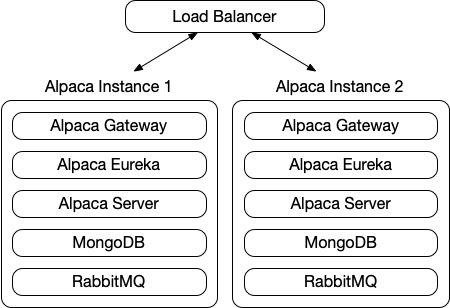
- Each server instance can host the complete set of processes required to create a clustered Alpaca setup. The below image is an example of such a setup.
BroadWorks Clusters
An Alpaca BroadWorks Cluster refers to the connection that Alpaca has to a BroadWorks XSP and AS to send and receive data. Alpaca can be configured to connect to multiple BroadWorks Clusters at one time.
Initial Setup / Adding Clusters
After the installation process has been completed, you will need to configure Alpaca to be able to communicate with your BroadWorks Cluster(s). Find the steps to take this below.
- Navigate to your Alpaca server via a web browser.
- Log in using the default credentials:
- username: admin
- password:
- It is recommended to immediately change the password upon login.
- From the navigation bar, expand the "Admin" drop-down and navigate to the "BroadWorks Clusters" page.
- To add a cluster, click the "Add Cluster" button and complete the form.
- Cluster Nickname - This is the nickname that will be used to describe the cluster. All clusters must have a unique nickname. Examples: "ECG Production" or "ECG Lab1".
- OCI Hostname - The address to send OCI calls to. This is the address of the XSP or EWS.
- BroadWorks Admin Username - This account is used by Alpaca to perform background information retrieval for items such as the searchable database and licensing information.
- BroadWorks Admin Password - The password for the account above.
- Once the form has been completed, click the "Save Changes" button. If an error has occurred, please check and verify that the credentials and addresses provided are correct.
- Repeat for each cluster.
Editing Clusters
Cluster information can be edited at any time by following the instructions below.
- Navigate the BroadWorks Cluster page. All BroadWorks Clusters that Alpaca has a connection with will appear here.
- Click on the cluster that needs to be edited.
- Modify the fields that need editing and click the "Update" button on the button right of the page.
Delete Clusters
Clusters can be removed from Alpaca at any time but please note that once a cluster has been removed its data will no longer be accessible via Alpaca.
- Navigate the BroadWorks Cluster page.
- Click on the cluster that needs to be deleted.
- Click the "Delete" button.
Remote Clients
Remote clients are configurations for Alpaca Remote installations on BroadWorks Application Servers or BroadWorks XSPs.
Adding Remote Clients
To add a Remote Client, navigate to the BroadWorks Cluster page and select an existing Cluster. Once expanded, click " Add Remote Client".
- Name - The unique name that will identify the Remote Client.
- Hostname - The hostname or url to the server that the Remote Client is on.
- Server Type - AS or XSP.
Once the form has been completed, click the "Save Changes" button. If an error has occurred, please check and verify the information and try again.
Modifying / Deleting Clients
To modify/delete a Remote Client, navigate to the BroadWorks Cluster page and select an existing Cluster. Once expanded, click the Remote Client that needs to be modified.
The hostname and server type can be updated, once done, click "Save Changes".
To delete the client, click the "Delete" button.
Access TokenThe access token is the unique identifier that tells Alpaca which remote it is talking to. This token can be refreshed, but once it is, the remote configuration will need to be updated and the remote restarted.
User Self-Care Portal
The User Self-Care Portal allows BroadWorks Users (user login type) to log in to Alpaca and modify their BroadWorks service settings. BroadWorks admins can limit what services can be modified or viewed. Requires the Advanced Provisioning License. Upon logging in, an Alpaca User backed by a BroadWorks User will automatically be directed to their own User page and will be limited to this page and their own task page.
Permissions
Alpaca admins can view and edit permissions for tables and inputs throughout Alpaca based on the user's assigned role.
Editing Permissions
As an admin, click on the permissions tab in the nav bar on the page that you wish to modify permissions. Then select the role you wish to view the page as. Once the role is selected, you can click "Edit Role" to modify how that role views the page.
Each input and table can have one of three permissions:
- WRITE: A User with the selected role can view and modify the element.
- READ: A User with the selected role can only view the element.
- HIDDEN: A User with the selected role cannot see the element.
To modify an element's permissions, click the pencil next to the element (or in the case of a table, at the bottom left of the footer) and then select the permission for the element. Once all elements you wish to modify have been updated, click the Permissions tab in the nav bar and click "Submit Permissions". If you wish to cancel changes, click the Permissions tab in the nav bar and click the "Cancel Edit" button.
Resetting BroadWorks Password
Alpaca allows non-Alpaca users to reset their BroadWorks portal password without having to log in to Alpaca or the BroadWorks portal. BroadWorks password resets will only work for users who have access to the email that is configured for their BroadWorks user in the profile section.
Process
- Navigate to
<ALPACA_URL>/password-reset. - Enter the email address associated with your BroadWorks user.
- If a user is found with the associated email, a verification email with a link will be sent to that email address.
- If a user is not found with the associated email, the password cannot be reset.
- Once an email has been sent, the user has 10 minutes before the reset link in the email expires.
- Click the link in the email to be redirected to the password reset form.
- Enter and confirm your desired password.
- Click
Submitto perform the password reset. - If successful, you will see "Password updated successfully.", otherwise an error will be displayed.
Number Inventory Management
When enabled, the Number Inventory Management feature tracks the State of DNs within a BroadWorks System and prevents ( unless overridden by an Admin) assigning DNs that have been recently un-assigned. Upon first boot of Alpaca 8.9.x+ (with Number Inventory enabled), all numbers will be gathered and inventory management will begin from that point in time. See Number Inventory Configuration for more details.
Number States
- Available - The number is assigned to a Service Provider and available to assign to a Group.
- Reserved - The number is assigned to a Group but not assigned to a User/Service Instance or as a Group Calling Line ID.
- In Service - The number is assigned to a User, Service Instance, or assigned as a Group Calling Line ID.
- Aging - The number was assigned, and is not waiting the configured amount of days before returning to an Available or Reserved state. Aging Numbers cannot be assigned unless a System Admin provides an override.
- Ported Out - The number was once in use in the BroadWorks System but is no longer assigned to any Service Provider.
Number Types
Number types only apply to Numbers that are In Service.
- Primary - Assigned as a User/Service Instance's Primary Number.
- Charge - Assigned as a Charge Number.
- Fax Messaging - Assigned as a Fax Messaging Number.
- Alternate - Assigned as an Alternate Number.
- Voice Portal - Assigned as a Group Voice Portal number.
Aging
A number begins to age once it has been moved out of the 'In Service' state. When aging, a number cannot be put back into an 'In Service' state unless a System Admin provides an override. Alpaca checks each number daily to see if the number of days the number has been aging has exceeded the configured aging period, if so the number is returned to the either Reserved, Available, or Ported Out depending on its current location.
Group Calling Line ID
A number that is a Group Calling Line ID is a special case as it can be assigned as a Group Calling Line ID or to a User/Service Instance. If a number is assigned as a Group Calling Line ID, it is marked as In Service. If a number is a Group Calling Line ID and assigned to a User/Service Instance, it is also marked as In Service. If a number that is assigned as both a Group Calling Line ID and a User/Service Instance number, and it is removed from one of those, it will remain as In Service until removed from both.
User Interface
A Number Inventory tab is available for System Admins on the Dashboard, Cluster, Service Provider, Group, User, and Service Instance landing pages. Here, the numbers can be viewed, filtered, and searched.
Table Fields
-
Number- The number as it is stored in the database. Note that all numbers are stored individually. Ranges are split up and stored as individual numbers. -
Rate Center- The assigned rate center. -
State- The number's current state. The table is filterable on this field. -
Owner- The entity the number is assigned to, if assigned. -
Owner Type- The owners BroadWorks type, i.e. Service Provider, Group, User, Call Center, etc. -
Cluster- The Cluster the number belongs to if assigned. -
Service Provider- The Service Provider the number belongs to, if assigned. -
Group- The Group the number belongs to, if assigned. -
Number Type- The type of number, if assigned. -
Group CLID- Whether the number is a Group Calling Line ID. -
Last Modified- The last time the number was modified, i.e. assigned, unassigned.
The table results can be searched. The search is a regular expression on the number field.
Parameter Maintenance
The Parameter Maintenance feature allows Admins to query a list of Users based off of provided filters and then apply prescribed actions to those users. Parameter Maintenance is available from the Actions tab of the Cluster, Service Provider, and Group pages.
Filters
Filters prescribe which users to apply actions to. If more than one filter is applied, only Users who match both filters will be returned. A maximum of 5 filters can be used.
Filter Categories
-
Service- Filter based on a BroadWorks User Service. -
Service Pack- Filter based on Service Pack.
Filter Type
-
Assigned- Matches Users who have the Service or Service Pack assigned. -
Un-assigned- Matches Users who have the Service or Service Pack unassigned.
Actions
Actions are BroadWorks actions that will be performed on each User who matches the provided filters.
Action Categories
-
Service- The action will assign or unassign a User Service. If the Service is not available to the User, no action will be applied to that User. -
Service Pack- The action will assign or unassign a Service Pack. If the Service Pack is not available to the User, no action will be applied to that User.
Action Type
-
Assign- Assigns the Service or Service Pack to the Users. -
Unassign- Unassigns the Service or Service Pack to the Users.
Endpoint Monitoring
Endpoint monitoring allows Alpaca Users to monitor updates to endpoints at the Group level via the Endpoints tab. Filters can be applied to limit what endpoints to monitor. If an entity that is being monitored updates, then the entity will be highlighted in the UI. The following entities on an endpoint are monitored:
- Registration Expiration
- Contact URI Update
- User Agent Update
- Config File Update (Alpaca Remote on XSP reading access logs required)
- Firmware File Update (Alpaca Remote on XSP reading access logs required)
Feature Quick Access
Feature Quick Access allows enabling/disabling a subset of BroadWorks services all in one place at the User Summary tab at the User location. The user can also be taken directly to the full service edit page for the selected services by following the link. The following services are accessible in the Feature Quick Access section (if assigned):
- Call Forwarding Always
- Call Forwarding Busy
- Call Forwarding No Answer
- Call Forwarding Not Reachable
- Call Forwarding Selective
- Do Not Disturb
- Remote Office
BroadWorks Objects
BroadWorks Objects refers to the various entities that we see within a BroadWorks System. Objects such as Users, Groups, ServiceProviders, Devices, and Service Instances are referred to as BroadWorks Objects.
Adding
The User Add and Group Add features will create a new user or group. These features can be combined with Add-ons to enable specific tasks to be performed when creating new users/groups using Alpaca.
User Add
This feature adds a new user with the provided settings to the current BroadWorks Group. This feature is accessible from a Group's Actions tab.
The following information is required when using the User Add Feature.
- User Id
- Provide the User Id for the new user.
- Domain
- Select the appropriate domain from the dropdown list.
- First Name
- The user's first name.
- Last Name
- The user's last name.
- Password
- The user's initial CommPilot password.
Group Add
This feature adds a group to the current BroadWorks Service Provider/Enterprise. This feature is accessible from a Service Provider/Enterprise's Actions tab.
The following information is required when using the Group Add Feature.
- Required information:
- Group Id:
- Provide the Id for the new group.
- Domain:
- Select the domain for the group from the drop-down list of available domains.
- User Limit:
- Provide the group's user limit.
- Group Id:
Deleting
The Delete feature allows you to delete a User, Group, or Service Provider. Note that this is a potentially dangerous function that will remove the entity from the BroadWorks System.
All objects that are deleted are also backed up in case the delete action was not intentional and the data needs to be restored.
User Delete
- This take will delete:
- The user
- The user's devices
- Any devices shared with another user will not be deleted.
- This will not delete:
- The user's phone number
- The phone numbers will be returned to the Group's number pool.
- The user's phone number
- Bulk User Delete - Ability to delete multiple Users at one time.
Group Delete
- This action will delete:
- The group
- All users contained within the group
- All devices contained within the group.
- This action will not delete:
- The group's assigned phone numbers.
- The phone numbers will be returned to the Service Provider/Enterprise's number pool
- The group's assigned phone numbers.
Service Provider Delete
This feature calls the Group Delete feature to remove the groups contained within the Service Provider/Enterprise.
- This action will:
- Delete the Service Provider/Enterprise
- All groups contained within the Service Provider/Enterprise.
- All users contained within the Service Provider/Enterprise.
- All devices contained within the Service Provider/Enterprise
- All phone numbers assigned to the Service Provider/Enterprise
- This action will not delete/remove:
- Any system level settings, like domains.
Searching
Alpaca has the capability to search through BroadWorks Objects, Audit Logs, Notifications, and Tasks.
Notifications
Notifications (previously Alerts) can be searched via the Notifications page which can be accessed by clicking the Notifications link on the Cluster page.
Searchable fields:
- Summary Message
Filterable fields:
- Notification Type
- Severity
- Cleared Status
- Acknowledged Status
Audit Logs
Audit log searches are available on all pages with either the Latest Changes or History tabs.
The fields that are searchable are:
- Command Type: An example would be "User Call Processing Policy Modified"
- The administrator who performed the action.
- The ID of the object the action was applied to.
BroadWorks Objects
Unlike the BroadWorks Portal, Alpaca has the ability to search through all supported BroadWorks Objects types in one search.
A BroadWorks object search can be performed via the search bar at the top of the page or via the individual searches on a type's tab. e.g. cluster, service provider, etc.
The fields that are searchable are:
- All object types
- BroadWorks ID
- BroadWorks Name
- Users
- Phone Number
- Extension
- Email Address
- Devices
- Mac Address
Alerting
Alpaca alerting can be configured on two different levels: system and cluster. To modify the system alerting
configuration, navigate to the alerting tab on the Alpaca dashboard. To modify the cluster level alerting configuration,
navigate to the alerting tab on the cluster view. Once the "use custom alerting configuration" option has been selected
at the Cluster level, all System configurations will be ignored for that cluster. To revert back to the System
configuration for that Cluster, simply click the "Use System Config" button on the Cluster level Alert Configuration
tab.
All alert types have a severity level that can be used to determine alert importance. If the severity is set to off, no
alert will be sent. The types of alerts are described below.
Alerts can currently be sent via email.
License Alerts
License alerts are threshold alerts that are triggered if a particular BroadWorks license exceeds the configured percentage. An alert will be sent if any license passes the threshold.
Blacklisted Admin Alerts
Blacklisted admin alerts are triggered when an admin that matches one of the regular expressions in the list performs an action in BroadWorks.
Password Change Alerts
Password change alerts are triggered anytime a password or passcode is modified.
The following password change alerts can be toggled on or off:
- SIP Authentication Password
- BroadWorks Admin Login Password
- User Web Portal Password
- Voice Portal Passcode
- Other Password - Includes password changes like device credentials changes, trunk group authentication changes, etc.
Unusual Time Change Alerts
Unusual Time Change alerts are triggered when an action is performed in BroadWorks outside the times configured.
High Volume of Change Alerts
A high volume of change alert is triggered when a large number of actions are performed over the configured amount of time. There are two types of high volume of change alerts:
- Admin Changes - Triggered when any admin performs more than the provided actions over the configured period of time.
- Cluster Changes - Triggered when the number of actions performed within the provided time is exceeded for the entire cluster.
BroadWorks Connection Failure Alerts
BroadWorks connection failure alerts are triggered when Alpaca can no longer connect to BroadWorks with the provided credentials.
BroadWorks Disconnect Alert
- Trigger condition:
- Triggered when Alpaca loses connection to BroadWorks.
- Clear condition:
- This alert should clear when Alpaca reconnects to BroadWorks.
- Acknowledgment:
- This alert is not automatically acknowledged.
Audit Log Read Alert
- Trigger condition:
- Audit log read alerts are triggered when Alpaca is not receiving logs from Alpaca Remote.
- Clear condition:
- This alert will clear once Alpaca is successfully communicating with Alpaca Remote.
- Acknowledgment:
- This alert is not automatically acknowledged.
Admin Added Alert
Admin Added Alerts are triggered anytime a BroadWorks admin is added.
The following Admin types can be toggled on or off:
- System Admin
- Service Provider Admin
- Group Admin
- Group Department Admin
Admin Deleted Alert
Admin Deleted Alerts are triggered anytime a BroadWorks admin is deleted.
The following Admin types can be toggled on or off:
- System Admin
- Service Provider Admin
- Group Admin
- Group Department Admin
User Created Alert
User Created Alerts are triggered anytime a user is added.
The following User types can be toggled on or off:
- BroadWorks User
- Auto Attendant
- BroadWorks Anywhere
- Call Center
- Collaborate Bridge
- Find-me/Follow-me
- Flexible Seating Host
- Group Paging
- Hunt Group
- Instant Group Call
- Meet Me Conferencing Bridge
- Route Point
- Voice XML
Email Notification Configuration
- Types of emails:
- New Alert - Sent when a new alert is triggered.
- Cleared Alert - Sent when an alert is cleared.
- Batched Alert - Sent when multiple alerts are triggered at a similar time. Those alerts will be compiled into one email.
- Email - The email addresses that the alerts are sent to.
- Subject - The subject line of the email.
- Body - The HTML body of the email.
Writing Templates
Alpaca uses a Thymeleaf email template engine. Examples can be seen below.
Object UsageA big part of Thymeleaf is that it allows the use of Java objects. The Alpaca object that is available for use in the
templates is the alert variable. Note that in the new alert and cleared alert templates, a single Alert is the object
that is available. The Batched Alerts templates have a list of alerts in the alerts variable. The variables on the
alert object that are available for use are as follows:
-
id- The object's unique id. -
cluster- The cluster the alert belongs to.-
nickname- The human-readable nickname of the cluster.
-
-
mode- The mode of the alert - Historical or Threshold.-
humanName- The human-readable name of the alert mode.
-
-
severity- The severity of the alert at the time of creation.-
humanName- The human-readable name of the alert severity.
-
-
type- The type of alert.-
humanName- The human-readable name of the alert type.
-
-
idMessage- Unique identifier for this alert type + object id -
summaryMessage- A summary of what the alert is about. -
detailMessage- The full detail of an alert. -
cleared- Whether the alert has been cleared. -
clearedDate- The date and time the alert was cleared. -
clearedBy- The user that cleared the alert. -
acknowledged- Whether the alert has been acknowledged. -
acknowledgedDate- The date and time the alert was acknowledged. -
acknowledgedBy- The user that acknowledged the alert. -
acknowledgedMessage- The acknowledged message.
<div class="jumbotron">
    <h1 class="display-3"><span th:text="${alert.type}">Alert Type</span> Cleared</h1>
    <p class="lead">This notification is a generated automatic service to you.</p>
    <hr class="my-4"/>
    <p>The following alert was cleared at <span th:text="${alert.clearedDate}">date</span> by
        <span th:text="${alert.clearedBy}">admin</span>.</p>
    <p th:text="${alert.detailMessage}">Alert detail message.</p>
    <p>You do not need to respond to this email.</p>
</div>
<div class="jumbotron">
    <h1 class="display-3"><span th:text="${alert.type.humanName}">Alert Type</span> Notification</h1>
    <p class="lead">This notification is a generated automatic service to you.</p>
    <hr class="my-4"/>
    <p th:text="${alert.detailMessage}">Alert detail message.</p>
    <p>You do not need to respond to this email. If, however, you think that this change may have been made in error or
        fraudulently, <b>please
            contact us immediately</b></p>
    <p class="lead">
        <a class="btn btn-primary" href="#" role="button">Contact Us</a>
    </p>
</div>
<div class="jumbotron">
    <h1 class="display-3">Notification of <span th:text="${alerts.size()}">#</span> Alpaca Alerts</h1>
    <p class="lead">This notification is a generated automatic service to you.</p>
    <!-- Thymeleaf Loop -->
    <div th:each="alert : ${alerts}">
        <hr class="my-4"/>
        <h4 th:text="*{alert.type.humanName}">Alert Type</h4>
        <p th:text="*{alert.detailMessage}">Detail Message</p>
    </div>
    <p>You do not need to respond to this email. If, however, you think that this change may have been made in error or
        fraudulently, <b>please
            contact us immediately</b></p>
    <p class="lead">
        <a class="btn btn-primary" href="#" role="button">Contact Us</a>
    </p>
</div>
Warnings
Warnings were introduced in Alpaca 10.6. While similar to Alerts, warnings relate to systems that Alpaca connects to that may not be working correctly but do not prevent Alpaca from working as expected.
Types
- Times Ten Warning - Indicates that one of the Times Ten connections is down, but the other is still up so Alpaca can continue to operate normally.
Tasks
Operations that are long-running are handled as background tasks within Alpaca. The Task pages allow their process to be tracked over time and later checked to ascertain details about their completion status. The Task pages can be accessed from the Task button in the header bar.
Task Difficulty
Every task and report has an assigned difficulty rating on a scale of 1-50. 1 being a simple task, 50 being a complicated one. An overall difficulty is calculated based on the task's difficulty rating and the estimated number of entities/objects that task involves. The difficulty is used to either warn the user that the task will be long-running or completely prevent the task from running based on what is configured in the Task Difficulty configuration.
Queuing
Once a task is started, it enters the task queue. The task queue is checked every 30 seconds (if another task is not already running) and the top task is pulled from the queue and started.
There are two task queues, one for reports and one for other tasks. These queues are separate from each other so Alpaca can run one task and one report at the same time.
Task Queue Types and Task Distribution
Task distribution in Alpaca is managed through different types of task queues: Single-Run and Multi-Run. This distribution is essential for managing tasks across various clusters and ensuring operational efficiency.
Single Run Task
When a single-run task is added to the queue, and a task from the same cluster is already running, no additional tasks are started. In a High Availability (HA) environment, if a server running a single-run task fails, Alpaca will fail over to another cluster, but the single-run task in progress does not move from the old Alpaca instance to a new Alpaca instance. The task will only finish on the instance that it started on.
- In a non-HA environment, the task will be marked as Stopped.
Multi Run Task
Multiple multi-run tasks can be added and run concurrently. These tasks allow for parallel execution.
- In an HA environment, each server can handle different task instances, allowing for greater throughput.
- In a non-HA environment, concurrent task execution is limited to the resources of a single server.
Task and Report Queue Distribution
Provisioning Tasks: Many are single-run, with some multi-run tasks for bulk operations.
Report Tasks: Always multi-run to allow concurrent report generation and processing.
System Tasks: Mainly single-run due to their critical system-level impact.
Recurring Tasks
Certain tasks, mainly reports and exports, can be set to recur automatically at a user defined interval.
Task Types
Provisioning
- Alpaca Delete (Single)
- Alpaca User Creation (Single)
- Bulk Dn Add (Multi)
- Bulk Provisioning (Multi)
- Bulk User Delete (Multi)
- Create Voicemail Box (Single)
- Custom Plugin (Multi)
- Device Reboot (Multi)
- Device Type Modify Polycom Phone Services (Single)
- Enterprise Import (Single)
- Group Access Device Add (Multi)
- Group Access Device Transform (Multi)
- Group Add (Multi)
- Group Bulk Acct Auth Codes Add (Multi)
- Group Bulk Calling Plan Authorization Codes Add (Multi)
- Group Clone (Single)
- Group Destroy (Multi)
- Group Export (Multi)
- Group Import (Single)
- Group To Enterprise (Single)
- Parameter Maintenance (Multi)
- Reset Sip Authentication (Multi)
- Service Provider Access Device Transform (Multi)
- Service Provider Add (Multi)
- Service Provider Destroy (Single)
- Service Provider Export (Multi)
- Service Provider Import (Single)
- System Access Device Transform (Multi)
- User Add (Multi)
- User Collection Import (Multi)
- User Destroy (Multi)
- User Disable Cisco Soft Client (Multi)
- User Enable Cisco Soft Client (Multi)
- User Export (Multi)
- User Import (Multi)
- User Replace (Multi)
Migrations
- Device Migration (Multi)
- User Migration (Multi)
- Enterprise Migration (Single)
- Group To Enterprise Migration (Single)
- Service Provider Migration (Single)
- User Collection Migration (Multi)
- User Replace (Multi)
Reports
See reports for more details on each report type.
- Admin Report (Multi)
- Alpaca Report (Multi)
- Audit Log Summary Report (Multi)
- Call History Report (Multi)
- Call Processing Call Limits Report (Multi)
- Communications Barring Criteria Report (Multi)
- Communications Barring Profile Report (Multi)
- Custom Tag Status Report (Multi)
- Device Details Report (Multi)
- Emergency CLID Report (Multi)
- Group Details Report (Multi)
- Group Service Assigned Report (Multi)
- MeetMe Conference Details Report (Multi)
- Number Inventory Report (Multi)
- Phone Numbers Report (Multi)
- Trunk Group User Report (Multi)
- User Call Forwarding Always Details Report (Multi)
- User Details Report (Multi)
- User Migration Encumbrance Report (Multi)
- User Outgoing Calling Plan Report (Multi)
- User Registrations Report (Multi)
- User Service Assigned Report (Multi)
- User Service Details Report (Multi)
- User Voice Portal Not Changed Report (Multi)
System and Other Tasks
- Add Cluster Name To Audit Logs (Single)
- Alpaca Migration (Single)
- Alpaca System (Single)
- BLF Cache Bootstrap (Single)
- BroadWorks Sync (Single)
- Cluster Delete (Single)
- Dev Re-Populate (Single)
- Device Access Bootstrap (Single)
- Device Resync (Single)
- Generate Load (Single)
- Group Resync (Single)
- Import Call Reporter Calls To Alpaca (Multi)
- Number Inventory Reset (Single)
- Search Index Process Resync Queue (Single)
- Search Index Repopulation (Single)
- Trunk Group User Creation Monitor (Single)
Individual Task Page
The individual task page allows you to see more information about a particular task. This is also the page you will be redirected to after starting any task. Here you can monitor the live tasks logs and download them when the task is complete. You can also view the task process report after it has been completed as well as basic information such as the start time, who started it, and where it was started from.
By clicking the Download Task Archive button you can download the entire task archive or in the case of reports, you can download the report output. Note that the tasks archive cannot be downloaded until the task is complete.
Task List Page
The Task List page allows you to view all tasks (depending on Task Authority in role)
Recurring Tasks Page
The Recurring Tasks page displays tasks that are set to occur. Recur intervals for tasks can be modified here. The statuses of recurring tasks can be viewed here. Note that if the entity that the task is for is deleted, the task will become invalid.
Selectable Interface
Certain pages in Alpaca have a selectable interface activated. This allows selection of multiple objects to perform a task. Individual objects can be selected, all objects on the current page, or all objects on all pages can be selected.
The following tasks are available through the selectable interface:
- Bulk User Delete
- Device Reboot
Task Cleanup
Tasks and reports will be cleaned up daily based off of their completed date and the configured retention period. The cleanup process will remove the following:
- All log files associated with the task.
- All attachment files associated with the task.
- The database object that the task is backed by.
- Temporary files generated from running the task.
This process will remove the files from the local file system or the S3 file system depending on which is currently in use.
Provisioning
Introduction
Provisioning of a standard User within BroadWorks can be an arduous task. The User must be added to a destination Group that meets all the requirements to host the User. Moreover, the User simply being added in BroadWorks does not create a working User. A working User requires the assignment of a phone number, creation and assignment of a device, and the assignment and configuration of services and service packs. Each step provides another opportunity for error to be introduced on the part of the provisioner.
To remedy these struggles, Alpaca provisioning allows for the creation of a User to be attached to a provisioning lifecycle. Each lifecycle step allows for additional provisioning that matches the workflow and use-cases of your BroadWorks platform. Alpaca comes equipped with lifecycle plugins to validate User data, perform intelligent data population, and perform the additional provisioning to result in a working and secure standard User. In addition, the lifecycle allows for the opportunity to make any changes and provisioning required to match your desired outcome. Visit the Alpaca developer guide to learn more about creating custom provisioning lifecycle plugins.
Migration
Device Migration
Introduction
It is sometimes necessary to replace an endpoint due to hardware failure or equipment upgrade. Without this tool, equipment replacement required that all the users be removed from the old device, the old device needed to be deleted, a new device was created, and all the users were re-provisioned on the new device. BroadWorks device tags were lost along with speed dials and calls lists.
Device Migration provides the functionality of modifying a Group or Service Provider Access Device’s MAC address, Name, or Device Type while retaining settings, assigned Users, configuration files, and custom tags.
Process
Device Migration can be accessed via the Migration button within the Actions tab on either the Group Access Device or Service Provider Access Device page.
- Select the Device Name, MAC Address, and Device Type. Note that you do not have to change all parameters.
- Click Check Requirements to check Device Migration Requirements. See below for more details.
- If there are Requirement errors, they will be printed to the screen, otherwise, the device is ready to be migrated.
- Click the Migrate Device button to perform the migration.
- After the button has been pressed, you will be redirected to the task page where you can monitor the status of the migration.
Background Procedure
- Retrieval of Device Information
- Retrieve Access Device configuration files
- Retrieve Access Device tags
- Check Device Migration Requirements
- Send reset command to Access Device
- Unassign Users from the Access Device
- Delete the original Access Device
- Create the new Access Device with desired settings
- Add Access Device tags
- Reassign Users
- Add Access Device custom files
- Rebuild the Access Device configuration
Recovery
Following the information retrieval process, the full details of the Device are backed up for recovery purposes. The settings information retrieved is backed up as JSON. Device configuration files are backed up in their original format. These files collectively can be used for recovery purposes.
Requirements
Requirements for a valid Device Migration are checked upon beginning a Device Migration.
- Available MAC Address
- The MAC address that is selected must be available across the BroadWorks system and must be valid.
- Device File Availability
- All non-custom Device configuration files must be accessible by Alpaca during the initial loading of device information.
- Obsolete Device Type
- The destination device type must not be marked as obsolete.
- Device Name
- The device name must be available for use.
Device File Migration
Introduction
During a migration process that involves Access Devices, there will commonly be a desire to migrate configuration files and templates during the process. A common scenario would be to migrate a directory configuration file so that manually configured speed dials can be retained following migration. To achieve this end configuration needs to occur within the Alpaca configuration file and the device must meet specific requirements as outlined below.
Configuration
Device file migration is controlled from the Alpaca Configuration. Further details on the specific values can be found here.
As an example, imagine we were migrating Device Types of the name "PolyTemplate". During the migration, we wished to move the directory file that controls speed dials. We could look in BroadWorks under the Files and Authentication section for the "PolyTemplate" device type. We would then insert the file formats of the files that we wished to migrate into the configuration. The final configuration would similar to this:
device-file-migration-rule-list:
  - device-type-regex: "PolyTemplate"
    file-regexes: [
      "%BWMACADDRESS%-directory.xml",
      "%BWMACADDRESS%-calls.xml",
    ]
This would inform Alpaca to migrate the specified files along with the device during migration procedures. If no device file migration rules are provided, Alpaca will skip the downloading of device files.
Supported Configurations
Device File retrieval and insertion can be performed in a number of ways.
For retrieval Alpaca currently supports Device Types using -
- Device Management Server (DMS) with HTTP/HTTPS/FTP
- Legacy with FTP
For insertion after a migration Alpaca currently supports -
- Device Management Server (DMS) with HTTP/HTTPS/FTP
This means that also we can migrate from a legacy Device Type we do not support migrating to a legacy Device Type.
Supported Device File Tags
Alpaca currently supports migration of device files using the following device file tags:
%BWMACADDRESS%%BWMACADDRESSUPPER%%BWDEVICEACCESSPORT%%BWDEVICEID%%BWFQDEVICEID%%BWDEVICEUSERNAME%
Enterprise Migration
Introduction
A BroadWorks's Service Provider or Enterprise can be highly customized with Groups, Users, Devices, Service Instances, and settings. The bulk of provisioning level settings reside under this umbrella of information. Because of this is it highly time-consuming to build and configure an Enterprise with all of its corresponding components. If later the Enterprise needs to be moved to a different application server cluster the process of collecting all the settings and information regarding the Enterprise is daunting.
Functional Description
This feature, Enterprise Migration, provides a function that allows BroadWorks' Enterprises to be moved from one BroadWorks system to another including Groups, Users, Devices, settings, passwords, greetings, and corresponding Device Management files, except as identified in Limitations.
The specific services and data migrated and supported are documented here:
Process
Enterprise Migration can be accessed via the Migration button within the Actions tab on the Service Provider page. Note that you can return to any previously completed step by clicking the check mark next to the step name.
- Once on the Enterprise Migration page, click the Start button to begin the process. Once clicked, the encumbrance check will begin.
- If no encumbrances are found, the next step will appear. Otherwise, you may not proceed until the encumbrances are resolved.
- In this step, you must choose the Cluster you wish to migrate the Enterprise/Service Provider to. Once chosen, click the Check Requirements button to proceed.
- If no requirements are found, the next step will appear. Otherwise, you may not proceed until the requirements are resolved.
- If all checks pass, the migrate step becomes available.
- Click Migrate User to begin the migration process.
- After the button has been pressed, you will be redirected to the task page where you can monitor the status of the migration.
As a part of the migration process, all entities (Users, Groups, Admins, Service Instances, etc.) that use the source default domain, will adopt the destination default domain upon migration completion.
Concepts
- Migration - The movement of a BroadWorks entity from one place to another without loss of data.
- Source Enterprise - The Enterprise that is going to be migrated.
- Source System - The BroadWorks System that contains the Enterprise that is going to be migrated.
- Destination System - The BroadWorks System that the Enterprise will be migrated to.
Background Procedure
Enterprise Migration performs a sequence of information retrieval prior to migration to ensure that the Enterprise meets the set of requirements that will allow the Enterprise to successfully migrate to the destination system. There are two types of restrictions that would prevent a valid migration - Requirements and Encumbrances. If either one of the restrictions contains errors then the migration will not be allowed to proceed. See the Limitations section for further information.
- Export the Enterprise or Service Provider from the Source BroadWorks system
- Check Migration Validity for Requirements and Encumbrances
- Remove Groups
- Remove Enterprise Trunk Number Ranges
- Remove Enterprise
- Create New Enterprise
- Authorize Services and Service Packs
- Add Enterprise Settings
- Add Service Settings
- Add Enterprise Service Settings (Enterprise Only)
- Add Devices
- Add Groups and their Users
- Add Enterprise Settings that need to be added after Groups
- Assign Users and Devices
- Add Credentials
Recovery and Rollback of Migration
BackgroundDuring migration activity, BroadWorks Users & Auto Attendants are deleted from the source system, and therefore BroadWorks Voicemail and Auto Attendant greetings are deleted. In general, with all BroadWorks features involved, some files will be deleted from the source system.
ECG recommends a backup that allows you to restore the system to all BroadWorks-managed files. This could include these options:
- File system snapshots
- Virtual machine snapshots
- BroadWorks complete backups
Alpaca Migration users can consider scheduling auto backup on the systems to complete before the migration maintenance window begins. For example, auto backup primary-side servers at 23:00, and secondary servers at 23:30, and then do migration work at 00:01.
Methods Option A: Import-based RollbackFollowing the information retrieval process (export) the full details of the Enterprise are backed up for recovery purposes. The settings information retrieved is backed up as JSON. Announcement files and device configuration files are backed up in their original format (e.g., .wav files are stored as .wav binary files). These files collectively can be used for recovery purposes.
Option B: Backup-Based RollbackIf, in a maintenance activity, an Alpaca user wishes to roll back to the primary system using file system backups
- Restore the TimesTen database
- Restore the BroadWorks-managed files that had been deleted in the process
Limitations
Non-Migrated ElementsAlpaca can migrate all non-system level BroadWorks settings that are accessible through OCI. The following elements cannot be migrated between BroadWorks Systems
- Service Pack Migration Tasks
- Enterprise Call Center Branding
- BroadWorks Receptionist Notes
- Call Center Reporting Data
- Any feature-related data stored uniquely on the DBS.
Requirements are restrictions on migration that are determined by inspecting the desired Destination Application Server to determine if the Enterprise can be moved into the Destination Application Server successfully.
- Domains
- The Domains (e.g., "xyz.com") that are available and being used by the Enterprise must exist in the target system.
- Device Types
- The Destination system must have all Identity Device profile types as currently used on the source system.
- Network Class of Service
- The Destination System must have all the Network Class of Services currently used on the source system.
- Office Zones
- The Destination System must have all the Offices Zones currently used on the source system.
- Media Sets
- The Destination System must have all the Media Sets currently on the source system.
- Service Licensing
- The Destination System must have enough Service Licenses available for each service that the source Enterprise uses.
- Carrier
- If the Source Enterprise is using a System Carrier, then the Destination BroadWorks Server must have the same Carrier(s) available.
- Route Point External System
- If the Source Enterprise is using a RoutePointExternalSystem, then the Destination BroadWorks Server must have the same RoutePointExternalSystem(s) available.
- Communication Barring Criteria
- If the Source Enterprise is using a System Communication Barring Criteria/Incoming Criteria, then the Destination BroadWorks System must have the same Communication Barring Criteria(s) available.
- Mobile Network (R21SP1)
- If the Source Enterprise is using a Mobile Network as a part of BroadWorks Mobility Mobile Subscriber, then the Destination BroadWorks System must have the same Mobile Network(s) available.
- Call Recording Platform
- If a Group in the Source Enterprise is using a System Call Recording Platform, then the same Call Recording Platform must be available on the Destination System.
- BroadWorks Software version, patches, and activatable features
- Must match between the Source and Destination BroadWorks Systems.
- Identity/Device Profile Types
- The Destination System must contain all the IDPTs that are in use by the Source Enterprise.
- Default Country Code
- The Default Country Code on the Destination System must be the same as that of the Source System.
- File System Protocol
- The File System Protocol on the Destination System must match that of the Source System.
- System Realm
- The System Realms of the Source and Destination Systems must match.
- System-Level Trunk Group Status Codes
- The Destination System must contain all the System-Level Trunk Group Status Codes that are being used on the Source System.
- Enhance Call Logging Configuration
- The Enhanced Call Logging Configurations on the Destination System must match the configuration of the Source System.
- Calling Party Categories
- The Destination System must contain all the Calling Party Categories that are being used by the Source Enterprise.
- Classmarks
- The Destination System must contain all the Classmarks that are being used by the Source Enterprise.
- The Source System must not have
- Pending Migration Tasks
- The Destination System must not have
- Telephone Numbers (DNS) that are being migrated from the Source System.
- The destination BroadWorks Application Server cluster may use the same Network Server as the source, or a different
network server. If the destination Network Server is not the same server as the source Network Server, the Destination
Network server must match the Source network server in these respects:
- Routing profiles that are named the same as in the Source Network Server for any groups or Service Providers that are moved.
- Dial Plans
- Default Country Code
- Voice VPN Settings
- The Destination System must have Provisioning Validation disabled (AS_CLI/Interface/ProvisioningValidation)
- Group IDs
- All Group IDs that are being used in the Source Enterprise must be available for use on the Destination Server.
- Routing Profile
- The destination BroadWorks Cluster must contain all Routing Profiles being used in the source Service Provider.
- System Password Rules
- The System Password Rules "Rules apply to" value must be the same on the source and destination for a valid migration.
- System Portal Passcode Rules
- If System Portal Passcode rules are being used by a Group in the Service Provider, the Source rules must not be less strict than the destination rules.
Encumbrances are restrictions that are contained within the Enterprise's settings. These restrictions do not require a Destination Application Server to be determined and can be checked in advance for potential migration targets.
- System Access Device
- If a User in the Enterprise is assigned to an Identity/Device Profile, and this is a System-level resource, then the Enterprise cannot be migrated.
- External Authentication
- If the Source Enterprise is using External Authentication, then the Enterprise cannot be migrated.
Group To Enterprise Migration
Introduction
A BroadWorks's Group can be highly customized with Users, Devices, and various service instances. The configuration process can be extensive and time-consuming. If the Group was originally created within a Service Provider, but now needs to exist within an Enterprise, the manual process of achieving this can be arduous.
This feature, Group to Enterprise Migration, provides a function that allows a BroadWork's Group that is currently within a Service Provider, to be moved out of that Service Provider to an Enterprise that was created based on the settings of the Group to be migrated. There is also an option to split the Group into multiple Groups
Process
Group To Enterprise Migration can be accessed via the Group To Enterprise Migration button within the Actions tab on the Group page. Note that you can return to any previously completed step by clicking the check mark next to the step name.
- Once on the Group to Enterprise Migration page, enter the name of the Enterprise you wish to create. Note that this must be a unique ID.
- In the next step, you can split up the Groups if you wish. To split up the Groups, enter a new Group Id in the box and press add. You can add as many Groups as needed. Once the Groups have been added, you may drag and drop the Users to the desired Group.
- Click Next Step to begin the encumbrance check. If no encumbrances are found, the next step will appear. Otherwise, you may not proceed until the encumbrances are resolved.
- The requirement checks will begin right after the encumbrance checks pass. If no requirements are found, the next step will appear. Otherwise, you may not proceed until the requirements are resolved.
- If all checks pass, the migrate step becomes available. Click Migrate To Enterprise to begin the migration process.
- After the button has been pressed, you will be redirected to the task page where you can monitor the status of the migration.
Background Procedure
Group to Enterprise Migration performs a sequence of information retrieval prior to migration to ensure that the Group meets the set of requirements and encumbrances that will allow the Group to successfully migrate out of the current Service Provider into a new Enterprise and possibly split into multiple Groups.
- Retrieve Group Information
- Check Migration Validity
- Remove Users from Group
- Remove Group
- Remove Phone Numbers from Service Provider
- Create New Enterprise
- Authorize Services and Service Packs
- Add Enterprise Settings
- Transform the single Group into multiple Groups (optional)
- Add Service Settings
- Add the Group(s) to the new Enterprise
Recovery
Following the information retrieval process, the full details of the Group are backed up for recovery purposes. The settings information retrieved is backed up as JSON. Announcement files and device configuration files are backed up in their original format. These files collectively can be used for recovery purposes.
Limitations
Encumbrances- Encumbrances are restrictions that are contained within the Group or Users settings. These restrictions do not require a Destination Enterprise to be determined and can be checked in advance for potential migration targets.
- Call Center Encumbrance
- If one of the Users who is being migrated out of the Group is an Agent or Supervisor on a Call Center, then the Migration is encumbered.
- Hunt Group Encumbrance
- If one of the Users who is being migrated out of the Group is an Agent on a Hunt Group, then the Migration is encumbered.
- Meet Me Conferencing Encumbrance
- If one of the Users who is being migrated out of the Group is a Host on a Conferencing Bridge, then the Migration is encumbered.
- Call Park Encumbrance
- If one of the Users who is being migrated is assigned to a Call Park, then all other Users who are assigned to that Call Park must also be migrated. The Call Park may not have Users who are not being migrated assigned, otherwise this is a migration encumbrance.
- Group Paging Encumbrance
- If a User who is being migrated out of the Group is included in the Originators or Targets List for a Group Paging, then the migration is encumbered.
- Collaborate Bridge Encumbrance
- If one of the Users who is being migrated out of the Group is an Owner on a Collaborate Bridge, then the Migration is encumbered.
- Find Me Follow Me Encumbrance
- If one of the Users who is being migrated out of the Group is in an Alerting Group of a Find Me Follow Me, then the Migration is encumbered.
- Call Pickup Encumbrance
- If one of the Users who is being migrated is assigned to a Call Pickup Group, then all other Users assigned to that Call Pickup Group must also be migrated. The Call Pickup Group may not have Users who are not being migrated assigned, otherwise this is a migration encumbrance.
- Trunk Group Encumbrance
- If a User who is to be migrated belongs to a Trunk Group or Enterprise Trunk or is a Pilot User on a Trunk Group, then the migration is encumbered.
- Device Encumbrance
- If a User who is being migrated is attached to a device, all other Users who are attached to the same device must also be migrated. If the device has Users who are not being migrated, then the migration is encumbered.
- Route Point Encumbrance - If the Group contains a Route Point, the migration is encumbered.
- Device Encumbrance - If the Group uses System or Service Provider level devices, the migration is encumbered.
- Attendant Console Encumbrance - If a Group's Auto Attendant monitors Users outside the Group, the migration is encumbered.
- Shared Call Appearance Encumbrance - If Users in a Group belong to an SCA shared to devices outside the Group, the migration is encumbered.
- Hunt Group Encumbrance - If a Group's Hunt Group has Users from another Group, the migration is encumbered.
- Meet Me Conferencing Encumbrance - If a host on one of the Group's Meet Me Conferencing Bridge belongs to another Group, the migration is encumbered.
- External Authentication Encumbrance - If external authentication is being used, the migration is encumbered.
Requirements are restrictions on migration that are determined by inspecting the desired Destination Enterprise to determine if the Group can be moved into the Destination Enterprise.
- Enterprise ID Requirement - The provided Enterprise ID must not belong to another Enterprise within the System, otherwise, the migration has requirements that are not met.
- Group ID Requirement - The provided Group IDs must not belong to other Groups within the System, otherwise, the migration has requirements that are not met.
User Migration
Introduction
In a large organization, a User may be placed in one Group, and highly customized with services, settings, greetings, devices, and memberships in Group services. But later the User needs to be moved to a different Group. Example 1: The User's original Group may have grown impractically large so that provisioning and management tools are inefficient. Example 2: Another reason to move a user between groups may be Call Pickup Groups (CPG): if a user needs to be in the same CPG with another, they must be in the same Group.
In these cases, deleting the User from one Group, then adding them back to the other, is a disruptive operation. A human operator needs to collect details on every setting, and on the User's device. To minimize the effect on Users moved, even their passwords must be migrated to their new group.
This feature, User Migration, provides a function that allows BroadWorks' Users to be moved from one Group to another Group with no loss of information, settings, passwords, greetings, or attached files.
Process
User Migration can be accessed via the Migration button within the Actions tab on the User page. Note that you can return to any previously completed step by clicking the check mark next to the step name.
- Once on the User Migration page, click the Start button to begin the process. Once clicked, the encumbrance check will begin.
- If no encumbrances are found, the next step will appear. Otherwise, you may not proceed until the encumbrances are resolved.
- In this step, you must choose the Group you wish to migrate the User to. Once chosen, click the Check Requirements button to proceed.
- If no requirements are found, the next step will appear. Otherwise, you may not proceed until the requirements are resolved.
- If all checks pass, the migrate step becomes available. Click Migrate User to begin the migration process.
- After the button has been pressed, you will be redirected to the task page where you can monitor the status of the migration.
Background Procedure
User Migration performs a sequence of information retrieval prior to migration to ensure that the User meets the set of requirements that will allow the User to successfully migrate to the Destination Group. There are two types of restrictions that would prevent a valid migration - Requirements and Encumbrances. If either one of the restrictions contains errors then the migration will not be allowed to proceed.
- Check Migration Validity
- Migrate Access Device
- Remove User
- Migrate Phone Number
- Create New User
- Set BLF entries on monitoring Users
- Set Non-Service User settings
- Add and Assign Services and Service Packs
- Add Custom Announcements
- Add Service specific settings
- Add Credentials
- Rebuild Access Device Configuration
Recovery
Following the information retrieval process, the full details of the User are backed up for recovery purposes. The settings information retrieved is backed up as JSON. Announcement files and device configuration files are backed up in their original format. These files collectively can be used for recovery purposes.
Limitations
RequirementsRequirements are restrictions that are determined by inspecting the desired Destination Group to determine if the User can be moved into the Destination Group successfully.
- Intra-Enterprise Inter-Group
- The source and destination group must exist within the same Enterprise.
- Domains
- The Domain (e.g., "xyz.com") that is applied to the User (at the Profile), and to the User's Identity/Device Profile Line/Port, must exist in the target group.
- Service and Service Pack Authorization
- Services and Service Packs that the User is currently assigned must be available within the Destination Group.
- Group Schedules
- The schedules contained within the User’s Source Group must also be contained within the User’s Destination Group.
- Group User Limit
- The Destination Group must have sufficient user availability to perform the move.
- Group Extension Length
- The Destination Group must have a valid extension length for the User.
- Group Extension Availability
- The Destination Group must have the current User extension available.
- Department Availability
- If a User is assigned to a Department, the Destination Group must have that Department available as well.
- User Voice Messaging
- If a User has the Voice Messaging User service assigned, either the Destination Group has to have Voice Messaging Group assigned or a System Voice Portal must exist otherwise the migration is not valid.
- Feature Access Code
- If a User's source Group has a Service assigned that adds extra Feature Access Codes, then the Destination Group must also have the service assigned to prevent loss of data. An example of this is Hunt Group. If a Group has the Hunt Group service assigned, the following Feature Access Codes are added to the User: Hunt Group Busy Activation, Hunt Group Busy Deactivation, Hunt Group Busy Interrogation.
- Network Class Of Service
- If a User has a Network Class of Service (NCOS), then the destination Group must have this NCOS available.
- Polycom Phone Services Custom Contact Directory
- If a User has Polycom Phone Services assigned and has a Group Custom Contact Directory configured for Polycom Phone Services, then the destination Group must include a Custom Contact Directory with the same name.
- Calling Plan
- If a User is using Digit Strings or Pinhole Digit Strings from the source Group, those Digit Strings need to be
- available on the destination.
Encumbrances are restrictions that are contained within the User’s settings and the User’s Access Device’s settings. These restrictions do not require a Destination Group to be determined and can be checked in advance for potential migration targets.
- Shared Call Appearance
- If the User has a Shared Call Appearance assignment on an Identity/Device Profile, and the Identity/Device Profile is a Group-Level resource, and if the Identity/Device Profile has any other User or Shared Call Appearance assigned to it, the User is not moved.
- Call Pickup Group
- If the User is a member of a Call Pickup Group, the User is not moved.
- Attendant Console
- If the User is monitoring any users, then the User will not be moved.
- Meet-Me Conferencing Bridge
- If the User has a Meet-Me Conferencing Bridge assigned, the User will not be moved.
- Single-User Device
- If the User is assigned to an Identity/Device Profile, and this is a group-level resource, then the Identity/Device Profile must have only this one user assigned to it. That is, the Group-level Identity/Device Profile cannot have multiple users assigned to it.
- Hunt Group
- If the User is a member of a Hunt Group they cannot be moved.
User Collection Migration
The User Collection Migration location allows the simultaneous migration of multiple Users that may have some entanglements from one Group to another. An example would be Users with a shared device. In a regular User Migration if the User has a shared device then the migration would be encumbered. In a User Collection Migration, we are able to move both Users and the device(s) they share.
Process
User Collection Migration can be accessed via the Group To Enterprise Migration button within the Actions tab on the Group page. Note that you can return to any previously completed step by clicking the check mark next to the step name.
- Once on the User Collection Migration page, choose the Group you wish to migrate the Users into.
- In the next step, drag all the Users that you wish to migrate over to the right drag and drop panel.
- Click Next Step to begin the encumbrance check. If no encumbrances are found, the next step will appear. Otherwise, you may not proceed until the encumbrances are resolved.
- The requirement checks will begin right after the encumbrance checks pass. If no requirements are found, the next step will appear. Otherwise, you may not proceed until the requirements are resolved.
- If all checks pass, the migrate step becomes available. Click Migrate to begin the migration process.
- After the button has been pressed, you will be re-directed to the task page where you can monitor the status of the migration.
Background Procedure
User Collection Migration performs a sequence of information retrieval prior to migration to ensure that the Users meet the set of requirements and encumbrances that will allow them to successfully migrate from their current Group to another.
- Retrieve User(s) Information.
- Check Migration Validity.
- Remove Users from Group.
- Remove Devices from Group.
- Add Phone Numbers to Destination.
- Add Devices to Destination.
- Add Users to Destination.
- Assign Devices to Users.
- Add User Service Settings.
Recovery
Following the information retrieval process, the full details of the Users are backed up for recovery purposes. The settings information retrieved is backed up as JSON. Announcement files and device configuration files are backed up in their original format. These files collectively can be used for recovery purposes.
Limitations
EncumbrancesEncumbrances are restrictions that are contained within the User's settings. These restrictions do not require a Destination Group to be determined and can be checked in advance for potential migration targets.
- Call Pickup Group Encumbrance - If a User is a member of a Call Pickup Group, the migration is encumbered.
- Meet Me Conferencing Encumbrance - If a User has a Meet Me Conferencing Bridge assigned, the migration is encumbered.
- Hunt Group Encumbrance - If a User is a member of a Hunt Group, the migration is encumbered.
- Group Calling Line ID Encumbrance - If a User has the same phone number as the Group Calling Line ID, the migration is encumbered.
- Enterprise Trunk Encumbrance - If a User is a member of an Enterprise Trunk, the migration is encumbered.
Requirements are restrictions on migration that are determined by inspecting the desired Destination Group to determine if the Users can be moved into the Destination Group.
- Group User Limit Requirement - If the Group does not have enough User space available to accommodate the migration, the migration is not valid.
- Intra-Enterprise Inter-Group Requirement - The source and destination group must exist within the same Enterprise or Service Provider, otherwise, the migration is not valid.
- Domain Requirement- The Domain (e.g., "xyz.com") that is applied to the User (at the Profile), and to the User's Identity/Device Profile Line/Port, must exist in the destination Group, otherwise the migration is not valid.
- Service and Service Pack Authorization Requirement - Services and Service Packs that the User is currently assigned must be available within the Destination Group.
- Group Schedules Requirement - The schedules contained within the User’s Source Group must also be contained within the User’s Destination Group, otherwise, the migration is not valid.
- Group Extension Length Requirement - The Destination Group must have a valid extension length for the User, otherwise, the migration is not valid.
- Group Extension Availability Requirement - The Destination Group must have the current User extension available, otherwise, the migration is not valid.
- Calling Plan - If a User is using Digit Strings or Pinhole Digit Strings from the source Group, those Digit Strings need to be available on the destination.
User Replace
Overview
BroadWorks users are customizable containers of business rules related to their business phone. It often includes details for call routing such as Call Forward Always, Hunt Groups, Call Centers, etc. There are also customizations such as user ID, username (First and Last), email addresses, and voice greetings.
When an employee leaves the organization or changes positions within the organization, it is often necessary to change or remove the customizations of the BroadWorks user. However, we don’t want to lose the embedded business logic associated with that user.
User Replace Tool for the replacement or removal of individual user specifics without losing the business logic.
Process
User Replace can be accessed via the Replace button within the Actions tab on the User page. Note that you can return to any previously completed step by clicking the check mark next to the step name.
- Once on the User Replace page, fill in the new first and last name.
- If Named Extension is selected, choose a new User Id, otherwise, the id will be in the format @.
- Select the Clear VM CC Address option if you would like for the BroadWorks voicemail carbon copy address to be cleared. Note that the carbon copy address will only be cleared if Voice Management is turned on.
- Select the Reset Devices option if you would like for the User's devices to reset after the replace operation has completed.
- Click Replace User when ready to begin.
- After the button has been pressed, you will be redirected to the task page where you can monitor the status of the migration.
Background Procedure
User Replace is designed to replace or reset user-specific customizations without losing the embedded business logic. As such, the process does not delete the underlying User. Rather it modifies settings to allow for an easy replacement of a BroadWorks user between real-world end users.
Procedure -
- Retrieve User Information
- Check that the desired User ID is available
- Modify the Busy Lamp Field URI
- The URI is updated to the new User ID + “_BLF”
- Update User Information
- First Name
- Last Name
- Calling Line ID First Name
- Calling Line ID Last Name
- Clear User Information
- Title
- Pager Number
- Mobile Number
- Email Address
- Address Street
- Address Location
- Generate new User web password compliant with Group password rules
- Clear Voicemail Greetings for -
- Busy Greeting
- No Answer Greeting
- Extended Away Greeting
- Alternate Greetings
- Personalized Name Greeting
- Delete all announcements in the User’s announcement repository
- Generate new Voice Portal passcode compliant with Group passcode rules
- Update Advanced Voice Management settings if service is assigned
- Clear the Carbon Copy Email Address if the ‘Clear CC’ is checked
- Disable Voicemail Forwarding unless the ‘Retain Forwarding Address’ is checked.
- Reset Voice Messaging Advanced settings
- UserId is First Initial + Last Initial + Extension
- Generated password
- Reset the User’s Access Devices
- Modify the User’s UserID
Requirements
Requirements for a valid User Replacement are checked upon beginning a replacement procedure. Any Requirement errors are presented in the “User Replace” page to alert the provisioner to the error.
- Available UserID
- The desired UserID must be available in the BroadWorks system.
Import / Export
Introduction
Import and Export are Alpaca tools that can be used to back up and replace BroadWorks entities if needed.
Export
Exporting an entity will produce an Alpaca Archive (typically a .tar.gz) that contains all information needed to
perform an import. Export can be accessed via the actions tab on the various BroadWorks entity pages. Once an export is
started, Alpaca will be redirected to the Export task page. Once the export has completed, the Alpaca Archive can be
retrieved via the download button on the task page.
Export is available for Service Providers, Enterprises, Groups, and Users.
Import
Import can be used to put a previously backed up or exported entity back into BroadWorks. Note that the entity must be removed from BroadWorks before attempting an import. Imports are meant to put an entity back into the same place that it was originally. Only archives that have been exported by Alpaca can be imported back into Alpaca.
To perform an import, navigate to the actions tab on the entity page that you want to import into, i.e. if you are importing a Group, you would want to go to the Service Provider/Enterprise level. You will then be prompted for a file. This is where you provide the exported or backed-up Alpaca Archive. Once the import task begins, Alpaca will be redirected to the Import task page. From here, the status of the import can be monitored. Note that the same validity checks that occur during a migration apply here, if the validity checks fail, the import cannot proceed.
Import is available for Service Providers, Enterprises, Groups, and Users.
Individual Reports
Report Types
CSV (Comma-separated Values)
A CSV file is a delimited text file that uses a comma to separate values. A CSV file stores tabular data (numbers and text) in plain text. Each line of the file is a data record. Each record consists of one or more fields, separated by commas. Most spreadsheet applications, such as Microsoft Excel and Google Sheets, support opening .csv files in an easy-to-read format. Although harder to interpret in plain text, most text processing applications support opening .csv files.
ExampleServiceProviderId,GroupId,UserId,CallForwardingAlwaysServiceEnabled,CallForwardingSelectiveServiceEnabled
Sample_ServiceProvider,Sample_Group,SampleUser@domain.com,true,false
Sample_ServiceProvider,Sample_Group,SampleUser2,false,false
TSV (Tab-separated Values)
A tab-separated values (TSV) file is a simple text format for storing data in a tabular structure, e.g., database table or spreadsheet data, and a way of exchanging information between databases. Each record in the table is one line of the text file. Each field value of a record is separated from the next by a tab character. Most spreadsheet applications, such as Microsoft Excel and Google Sheets, support opening .tsv files in an easy-to-read format. Although harder to interpret in plain text, most text processing applications support opening .tsv files.
ExampleServiceProviderId GroupId UserId CallForwardingAlwaysServiceEnabled CallForwardingSelectiveServiceEnabled
Sample_ServiceProvider Sample_Group SampleUser@domain.com true false
Sample_ServiceProvider Sample_Group SampleUser2 false false
Excel (XLSX)
Reports outputted in an Excel format are meant to be opened in a spreadsheet processor such as Microsoft Excel.
ExampleTXT
Reports outputted in plain text will be formatted in an ASCII table and are best viewed from a terminal.
Example┌──────────────────────┬────────────┬─────────────────────┬──────────────────────────────────┬─────────────────────────────────────┐
│ServiceProviderId │GroupId │UserId │CallForwardingAlwaysServiceEnabled│CallForwardingSelectiveServiceEnabled│
├──────────────────────┼────────────┼─────────────────────┼──────────────────────────────────┼─────────────────────────────────────┤
│Sample_ServiceProvider│Sample_Group│SampleUser@domain.com│true │false │
├──────────────────────┼────────────┼─────────────────────┼──────────────────────────────────┼─────────────────────────────────────┤
│Sample_ServiceProvider│Sample_Group│SampleUser2 │false │false │
└──────────────────────┴────────────┴─────────────────────┴──────────────────────────────────┴─────────────────────────────────────┘
Admin Report
Description
The Admin Report provides details about BroadWorks Admins that match the provided filters.
Columns
-
Admin Id- The ID of the administrator. -
Admin Type- The administrator type, i.e. System, Provisioning, Group, etc. -
First Name- The first name of the administrator (if configured). -
Last Name- The last name of the administrator (if configured). -
Group Id- The ID of the Group that the administrator belongs to (if Group Admin or Department Admin). -
Service Provider Id- The ID of the Service Provider/Enterprise the administrator belongs to (if Service Provider Admin or below). -
Cluster- The name of the Cluster the administrator belongs to.
Audit Log Detail Report
Description
The Audit Log Detail report provides condensed details about audit logs for the selected entity. The report can be run from the Dashboard, Cluster, Service Provider, Device, Group, User, and Admin levels. To run the report, navigate to either the Latest Changes or History tab, choose the appropriate filters (if necessary), and then click the download button in the bottom right corner of the tab.
Columns
-
Request- The BroadWorks request that was performed. -
Target- The target of the request, i.e. the entity affected by the request. -
Target Type- The type of object the target is, i.e. User, Group, etc. -
Modifier- The user/admin who performed the request -
Modifier Type- The type of object the modifier is, i.e. System Admin, Group Admin, User, etc. -
Cluster- The cluster the request was performed on. -
Date- The date the request was performed.
Call History Report
Description
The Call History report provides condensed details about calls for the selected entity. The report can be run from the Dashboard, Cluster, Service Provider, Group, and User levels. To run the report, navigate to the Call History tab, choose the appropriate filters (if necessary), and then click the download button in the bottom right corner of the tab. Call History license is required.
Columns
-
User Id- The ID of the BroadWorks User that either received or placed the call. -
User Type- The user type, i.e. Normal, Hunt Group, Auto Attendant, etc. -
Name- The name of the BroadWorks User, first + last. -
User Number- The number assigned to the user. -
Call Direction- Either Originating or Terminating. -
Calling Number- The number of the entity that placed the call. -
Called Number- The number of the entity that recieved the call. -
Caller Id- The caller id value that was displayed, if available. -
Answered- Whether the call was answered. -
Start Time- The start time for the call. -
End Time- The end time for the call. -
Duration (seconds)- The duration of the call in seconds. From the time the call was placed to the time the call was released. -
Cluster- The Cluster the user belongs to. -
Service Provider- The Service Provider/Enterprise the user belongs to. -
Group- The Group the user belongs to. -
Redirecting Reason- If the call was redirected, this field will list the reason why. -
Call Type- The call type assigned by BroadWorks. -
Call Category- The call category assigned by BroadWorks. Options: Emergency, Interlata, Intralata, International, Local, National, Private (intra-group), Other. -
Auth Code- The authorization code used, if available. -
Account Code- The account code used, if available.
Call Processing Call Limits Report
Description
This report summarizes the Call Processing Limits set in BroadWorks for a set of Groups.
Columns
-
ServiceProviderId- ID of the Service Provider the Group belongs to. -
GroupId- ID of the Group. -
PolicyLevel- Whether the Service Provider or Group level rules are being used. -
Max Concurrent Calls- Maximum number of concurrent calls supported. -
Mac Concurrent Video Calls- Maximum number of concurrent video calls supported. -
Max Duration for Answered Calls- Maximum call time (in minutes) for answered calls. -
Max Duration for Unanswered Calls- Maximum call time (in minutes) for unanswered calls. -
Max Concurrent Redirected Calls- Maximum number of redirected (simultaneous forwards) calls. -
Max Concurrent Find Me/Follow Me Invocations- Maximum number of simultaneous call processing invocations (calls) for services with Follow Me redirection/ -
Max Find Me/Follow Me Depth- Maximum depth of forking for Simultaneous Ringing, Sequential Ringing, and Remote Office services. -
Max Redirection Depth- Maximum depth (call chaining) during the redirection process.
Communication Barring Criteria Report
Description
The Communication Barring Criteria Report provides details about Communication Barring criteria for all the Service Providers in the system with a Communication Barring Criteria assigned. This report is only available at the cluster level.
Columns
-
ServiceProviderId- The ID of the Service Provider that the User belongs to. -
CriteriaName- The name of the Criteria -
CriteriaDescription- The description of the criteria
Communication Barring Profile Report
Description
The Communication Barring Profile Report provides details about Communication Barring profiles for all the Service Providers in the system with a Communication Barring Profile. This report is only available at the cluster level.
Columns
-
ServiceProviderId- The ID of the Service Provider that the User belongs to. -
CallBarringProfile- The name of the profile. -
description- The description of the profile. -
isDefault- Whether the profile is the default.
For information on the following columns see the official BroadWorks Documentation .
originatingDefaultActionoriginatingDefaultTreatmentIdoriginatingDefaultTransferNumberoriginatingDefaultCallTimeoutoriginatingRule_criteriaoriginatingRule_actionoriginatingRule_timeScheduleredirectingDefaultActionredirectingDefaultCallTimeoutredirectingRule_criteriaredirectingRule_actionredirectingRule_timeSchedulecallMeNowDefaultActioncallMeNowDefaultCallTimeoutcallMeNowRule_criteriacallMeNowRule_actioncallMeNowRule_timeScheduleincomingDefaultActionincomingDefaultCallTimeoutincomingRule_criteriaincomingRule_actionincomingRule_timeSchedule
Custom Tag Status Report
Description
The Custom Tag Status Report provides the values for the selected tags (or all tags in that entity (Group, SP, System) if not are specifically selected) on a per-device basis. Can be used at the Cluster, ServiceProvider, and Group levels.
Columns
-
Device Name- Name of the BroadWorks device. -
Device Type- The IDPT. -
Device Level- The device level, i.e. Group, Service Provider, System -
Group- The Group the device belongs to (if applicable) -
Service Provider- The Service Provider the device belongs to (if applicable). -
Tag Set- The tag set assigned to the device (if applicable). - The rest of the column headers represent the tag names that were chosen for the report. The cell values will be the device's value for that tag if the tag is configured for that device.
Device Details Report
Description
The Device Details Report provides details about all devices in the system. This includes all System, Service Provider, and Group Access Devices.
Columns
-
Organization ID- The ID of the Service Provider or Enterprise that the device belongs to if applicable. -
Group ID- The ID of the Group that the device belongs to if applicable. -
Identity/Device Profile Name- The name of the device. -
Identity/Device Profile Type- The device type. -
MAC Address- The device's MAC address. -
Configuration- The device's configuration type. -
Access Protocol- The access protocol the device uses. -
Provisioning URL- The provisioning URL to use to register the device.
Emergency CLID Report
Description
Provides details on what phone number would appear to the 911 operator if the user was to make an emergency call.
Columns
-
ServiceProviderId- ID of the Service Provider. -
GroupId- ID of the Group. -
UserId- ID of the User. -
PhoneNumber- Phone number for the User. -
Extension- Extension for the User. -
Source- Whether USE DN or USE CONFIGURABLE CLID is configured and what level it is set at. -
Emergency CLIN- The phone number that will appear to the 911 operator if the User places an emergency call.
Group Details Report
Description
The Group Details Report includes basic Group information as well as select group service information. Can be used at the Cluster and Service Provider Group levels.
Columns
-
GroupId- ID of the Group. -
ServiceProviderId- ID of the Service Provider. -
Group Name- Name of the Group. -
Calling Line ID Name- The Group's Calling Line ID Name (if set). -
Calling Line ID Number- The Group's Calling Line ID Phone Number (if set). -
Default Domain- The Group's default domain. -
User Limit- The Group's user limit. -
User Count- The number of users currently in the Group. -
Routing Profile- The Group's routing profile. -
Business Trunking Licenses- The number of Business Trunking Licenses allocated to the Group (if Trunk Group service is assigned). -
Bursting Business Trunk Licenses- The number of Bursting Business Trunk Licenses allocated to the Group (if Trunk Group service is assigned). Not available for R22. -
Allocated Bursting Calls- The number of allocated bursting calls (if Trunk Group service is assigned). -
SAC Mode- The Sessions Admission Control mode. Either Control by SAC group only or Control aggregate sessions as wel as SAC Groups. -
SAC Max Concurrent Sessions- The maximum number of concurrent sessions allowed for the group. -
SAC Max Originating Sessions- The maximum number of originating sessions allowed for the group. -
SAC Max Terminating Sessions- The maximum number of terminating sessions allowed for the group. -
SAC Count Intra Group Sessions- Whether Count Intra Group sessions is enabled.
Group Service Assigned Report
Description
The Group Service Assigned Report details which Groups within the current entity (Cluster, Service Provider) have or don't have the provided service assigned. Can be used at the Cluster and Service Provider levels.
Columns
-
GroupId- The ID of the Group that the User belongs to. -
ServiceProviderId- The ID of the Service Provider that the User belongs to. -
ServiceName- The name of the User Service that is being checked for assignment. -
Assigned- Boolean value that denotes whether the provided service is assigned. -
Enabled- Boolean value that denotes whether the provided service is enabled. Note that not all services can be enabled.
Meet Me Conferencing Report
Description
The MeetMe Conferencing Report provides details about a User's Meet Me Conferencing settings and configuration. Can be used at the Cluster, ServiceProvider, and Group levels.
Columns
-
UserId- The ID of the BroadWorks User that the row relates to. -
GroupId- The ID of the Group that the User belongs to. -
ServiceProviderId- The ID of the Service Provider that the User belongs to. -
LastName- The User's last name. -
FirstName- The User's first name. -
EmailAddress- The User's Email Address -
Bridge ID- The ID of the Bridge that the conference is on. -
Title- The title of the conference. -
Max Participants- The maximum amount of participants allowed on the conference. -
Security PIN enabled- Whether Security PIN is enabled for the conference. -
Security PIN- The conference's security pin. -
Schedule Type- The schedule type for the conference. -
Phone Number- The bridge's phone number. -
Extension- The bridge's extension. -
Conference ID- The ID of the conference. -
Moderator ID- The ID of the moderator for the conference. -
Moderator Required- Whether a moderator is required.
Number Inventory Report
The Number Inventory report provides condensed details about phone numbers for the selected entity. The report can be run from the Dashboard, Cluster, Service Provider, Group, and User levels. To run the report, navigate to the Number Inventory tab, choose the appropriate filters (if necessary), and then click the download button in the bottom right corner of the tab. Call History license is required.
Columns
-
Number- The phone number. -
Number Type- The phone number type. Primary, Fax, Alternate, Voice Portal. -
Number State- The state the number is currently in. Available, Reserved, In Service, Aging, Ported Out. See number states for more information. -
Rate Center- The rate center for the number. -
Activated- Whether the number is activated in BroadWorks. -
Is Group Calling Line Id- Whether the number is assigned as a Group CLID. -
Owner- The ID of the entity that the number is currently assigned. Can be a User, Service Instance, Group, Service Provider/Enterprise. -
Owner Type- The type of the entity that the number is currently assigned to. -
First Name- The first name of the entity the number is assigned to, if available. -
Last Name- The last name of the entity the number is assigned to, if available. -
Service Provider- The ID of the Service Provider/Enterprise that the number is in. -
Group- The ID of the Group that the number is in, if available. -
Cluster- The name of the cluster the number is in. -
Aging Start Date- The date/time the number began aging (if in aging state). -
Aging End Date- The date/time the number will be finished aging (if in aging state). -
Created Date- The date/time the number was added to the Alpaca database. -
Last Modified Date- The date/time of the last time Alpaca recorded a change to the number.
Phone Numbers Report
Description
The Phone Numbers Report provides information about where each number in the system is assigned and whether it is activated or not.
Columns
-
ServiceProviderId- The ID of the Service Provider or Enterprise that the number is assigned to. -
ServiceProviderName- The name of the Service Provider or Enterprise that the number is assigned to. -
GroupId- The ID of the Group that the number is assigned to if applicable. -
GroupName- The name of the Group that the number is assigned to if applicable. -
UserId- The ID of the user the number is assigned to if applicable. -
PhoneNumber- The phone number. -
Activated- Whether the number is activated.
Trunk Group User Report
Description
The Trunk Group User Report provided details about users assigned to Trunk Groups.
Columns
-
ServiceProviderId- The ID of the Service Provider that the User belongs to. -
GroupId- The ID of the Group that the User belongs to. -
UserId- The ID of the Broadworks User that the row relates to. -
FirstName- The User's first name. -
LastName- The User's last name. -
TrunkGroup- The name of the Trunk Group that the User belongs to. -
Phone Number- The User's phone number. -
Extension- The User's extension. -
IsPilotUser- Whether the User is a Pilot User on the assigned Trunk Group.
User Call Forwarding Details Report
Description
The User Call Forwarding Report provides details about a User's Call Forwarding settings. This includes Call Forwarding Always, Call Forwarding Always Secondary, Call Forwarding Busy, Call Forwarding No Answer, Call Forwarding Not Reachable, and Call Forwarding Selective. Can be used at the Cluster, ServiceProvider, and Group levels.
Columns
-
ServiceProviderId- The ID of the Service Provider that the User belongs to. -
GroupId- The ID of the Group that the User belongs to. -
UserId- The ID of the Broadworks User that the row relates to. -
CallForwardingAlwaysIsActive- Whether the Call Forwarding Always user service is active. -
CallForwardingAlwaysForwardNumber- The forwarding phone number for Call Forwarding Always (if configured). -
CallForwardingAlwaysRingSplash- Whether ring splash is enabled for Call Forwarding Always. -
CallForwardingAlwaysSecondaryIsActive- Whether the Call Forwarding Always Secondary user service is active. -
CallForwardingAlwaysSecondaryForwardNumber- The forwarding phone number for Call Forwarding Always Secondary (if configured). -
CallForwardingAlwaysSecondaryRingSplash- Whether ring splash is enabled for Call Forwarding Always Secondary. -
CallForwardingBusyIsActive- Whether the Call Forwarding Busy user service is active. -
CallForwardingBusyForwardNumber- The forwarding phone number for Call Forwarding Busy (if configured). -
CallForwardingNoAnswerIsActive- Whether the Call Forwarding No Answer user service is active. -
CallForwardingNoAnswerForwardNumber- The forwarding phone number for Call Forwarding No Answer (if configured). -
CallForwardingNoAnswerNumberOfRings- The number of rings configured for Call Forwarding No Answer. -
CallForwardingNotReachableIsActive- Whether the Call Forwarding Not Reachable user service is active. -
CallForwardingNotReachableForwardNumber- The forwarding phone number for Call Forwarding Not Reachable (if configured). -
CallForwardingSelectiveIsActive- Whether the Call Forwarding Selective user service is active. -
CallForwardingSelectiveForwardNumber- The forwarding phone number for Call Forwarding Selective (if configured). -
CallForwardingSelectiveRingReminder- Whether ring reminder is enabled for Call Forwarding Selective.
User Details Report
Description
The User Details Report includes basic User information as well as select user service information. Can be used at the Cluster, Service Provider, and Group levels.
Columns
-
Type- The type of User i.e. User, Call Center, HuntGroup, etc. -
UserId- The ID of the BroadWorks User that the row relates to. -
LastName- The User's last name. -
FirstName- The User's first name. -
GroupId- The ID of the Group that the User belongs to. -
ServiceProviderId- The ID of the Service Provider that the User belongs to. -
PhoneNumber- The User's phone number. -
Extension- The User's extension. -
LinePort- The line port of the User's primary device. -
DeviceType- The device type of the User's primary device. -
MacAddress- The mac address of the User's primary device. -
DeviceName- The device name of the User's primary device. -
AccessDeviceLevel- The device level of the User's primary device. i.e. Group, Service Provider, System -
ConfigurationMode- The Configuration mode of the User's primary device. -
VoiceMailCarbonCopyAddress- The User's voicemail carbon copy email address. -
isRegistered- Boolean value of whether the User's primary device is registered. -
Services- A list of services that are assigned to the User. -
ServicePacks- A list of service packs that are assigned to the User. -
CLIDLastName- The User's Calling Line ID Last Name. -
CLIDFirstName- The User's Calling Line ID First Name. -
CLIDPhoneNumber- The User's Calling Line ID Phone Number. -
HiraganaLastName- The User's Hiragana last name. -
HiraganaFirstName- The User's Hiragana first name. -
Language- The User's selected language. -
TimeZone- The User's selected time zone. -
TimeZoneDisplayName- The display name for the User's selected time zone. -
DefaultAlias- The User's default alias. -
CFAisActive- Whether Call Forwarding Always is active. -
CFANumber- The User's Call Forwarding Always forward to number. -
CFARingSplash- Whether Call Forwarding Always Ring Splash is selected. -
CFBisActive- Whether Call Forwarding Busy is active. -
CFBNumber- The User's Call Forwarding Busy forward to number. -
CFNAisActive- Whether Call Forwarding Not Available is active. -
CFNANumber- The User's Call Forwarding Not Available forward to number. -
CFNARings- The User's Call Forwarding Not Available number if rings. -
CallWaitingIsActive- Whether Call Waiting is active. -
DisableCLIDDelivery- Whether Disable Calling Line ID Delivery is enabled. -
CLIDBlocking- Whether Calling Line ID Blocking is enabled. -
CallingNameRetrieval- Whether Calling Name Retrieval is enabled. -
DNDIsActive- Whether the Do Not Disturb function is active. -
DNDRingSplash- Whether the Do Not Disturb Ring Splash function is active. -
ExternalCLIDDeliveryIsActive- Whether External Calling Line ID Delivery is active. -
Department- The User's department. -
NCOS- The User's selected Network Class Of Service. -
InTrunkGroup- Whether the User is a trunking User. -
IsPilotUser- Whether the User is a Pilot User.
User Migration Encumbrance Report
Description
The User Migration Encumbrance Report is used pre-migration to determine if a user (or group of users) is encumbered. ``
Columns
-
Type- The user type. -
UserId- The ID of the User. -
LastName- The last name of the User. -
FirstName- The first name of the User. -
GroupId- The ID of the Group that the User belongs to. -
ServiceProviderId- The ID of the Service Provider that the User belongs to. -
PhoneNumber- The phone number of the User. -
Extension- The extension of the User. -
Encumbrances- The list of encumbrances (if any are found).
User Outgoing Calling Plan Report
Description
The User Outgoing Calling Plan Report summarizes all Users Outgoing Calling Plan settings (whether custom or inherited from the Group) for the location selected. Only Users whose Group has the Outgoing Calling Plan and/or Enhanced Outgoing Calling Plan service(s) assigned will be included. Can be used at the Cluster, ServiceProvider, and Group levels.
Columns
-
ServiceProviderId- ID of the Service Provider. -
GroupId- ID of the Group. -
UserId- ID of the User. -
Custom Settings- Whether custom settings are being used. False if using the Group level settings. -
Originating_Group- The "permitted" value for the "Group" setting within "Originating Calls". Possible value: Disallow, Allow, Authorization Code Required, Transfer To First Transfer Number, Transfer To Second Transfer Number, Transfer To Third Transfer Number -
Originating_Local- The "permitted" value for the "Local" setting within "Originating Calls". Possible value: Disallow, Allow, Authorization Code Required, Transfer To First Transfer Number, Transfer To Second Transfer Number, Transfer To Third Transfer Number -
Originating_Toll_Free- The "permitted" value for the "Toll Free" setting within "Originating Calls". Possible value: Disallow, Allow, Authorization Code Required, Transfer To First Transfer Number, Transfer To Second Transfer Number, Transfer To Third Transfer Number -
Originating_Toll- The "permitted" value for the "Toll" setting within "Originating Calls". Possible value: Disallow, Allow, Authorization Code Required, Transfer To First Transfer Number, Transfer To Second Transfer Number, Transfer To Third Transfer Number -
Originating_International- The "permitted" value for the "International" setting within "Originating Calls". Possible value: Disallow, Allow, Authorization Code Required, Transfer To First Transfer Number, Transfer To Second Transfer Number, Transfer To Third Transfer Number -
Originating_Operator_Assisted- The "permitted" value for the "Operator Assisted" setting within "Originating Calls". Possible value: Disallow, Allow, Authorization Code Required, Transfer To First Transfer Number, Transfer To Second Transfer Number, Transfer To Third Transfer Number -
Originating_Chargeable_Directory_Assistance- The "permitted" value for the "Chargeable Directory Assistance" setting within "Originating Calls". Possible value: Disallow, Allow, Authorization Code Required, Transfer To First Transfer Number, Transfer To Second Transfer Number, Transfer To Third Transfer Number -
Originating_Special_Services_1- The "permitted" value for the "Special Services I" setting within "Originating Calls". Possible value: Disallow, Allow, Authorization Code Required, Transfer To First Transfer Number, Transfer To Second Transfer Number, Transfer To Third Transfer Number -
Originating_Special_Services_2- The "permitted" value for the "Special Services II" setting within "Originating Calls". Possible value: Disallow, Allow, Authorization Code Required, Transfer To First Transfer Number, Transfer To Second Transfer Number, Transfer To Third Transfer Number -
Originating_Premium_Services_1- The "permitted" value for the "Premium Services I" setting within "Originating Calls". Possible value: Disallow, Allow, Authorization Code Required, Transfer To First Transfer Number, Transfer To Second Transfer Number, Transfer To Third Transfer Number -
Originating_Premium_Services_2- The "permitted" value for the "Premium Services II" setting within "Originating Calls". Possible value: Disallow, Allow, Authorization Code Required, Transfer To First Transfer Number, Transfer To Second Transfer Number, Transfer To Third Transfer Number -
Originating_Casual- The "permitted" value for the "Casual" setting within "Originating Calls". Possible value: Disallow, Allow, Authorization Code Required, Transfer To First Transfer Number, Transfer To Second Transfer Number, Transfer To Third Transfer Number -
Originating_URL_Dialing- The "permitted" value for the "URL Dialing" setting within "Originating Calls". Possible value: Disallow, Allow, Authorization Code Required, Transfer To First Transfer Number, Transfer To Second Transfer Number, Transfer To Third Transfer Number -
Originating_Unknown- The "permitted" value for the "Unknown" setting within "Originating Calls". Possible value: Disallow, Allow, Authorization Code Required, Transfer To First Transfer Number, Transfer To Second Transfer Number, Transfer To Third Transfer Number -
Redirecting_Group- The "permitted" value for the "Group" setting within "Initiating Call Forwards/Transfers". Possible value: TRUE, FALSE -
Redirecting_Local- The "permitted" value for the "Local" setting within "Initiating Call Forwards/Transfers". Possible value: TRUE, FALSE -
Redirecting_Toll_Free- The "permitted" value for the "Toll Free" setting within "Initiating Call Forwards/Transfers". Possible value: TRUE, FALSE -
Redirecting_Toll- The "permitted" value for the "Toll" setting within "Initiating Call Forwards/Transfers". Possible value: TRUE, FALSE -
Redirecting_International- The "permitted" value for the "International" setting within "Initiating Call Forwards/Transfers". Possible value: TRUE, FALSE -
Redirecting_Operator_Assisted- The "permitted" value for the "Operator Assisted" setting within "Initiating Call Forwards/Transfers". Possible value: TRUE, FALSE -
Redirecting_Chargeable_Directory_Assistance- The "permitted" value for the "Chargeable Directory Assistance" setting within "Initiating Call Forwards/Transfers". Possible value: TRUE, FALSE -
Redirecting_Special_Services_1- The "permitted" value for the "Special Services I" setting within "Initiating Call Forwards/Transfers". Possible value: TRUE, FALSE -
Redirecting_Special_Services_2- The "permitted" value for the "Special Services II" setting within "Initiating Call Forwards/Transfers". Possible value: TRUE, FALSE -
Redirecting_Premium_Services_1- The "permitted" value for the "Premium Services I" setting within "Initiating Call Forwards/Transfers". Possible value: TRUE, FALSE -
Redirecting_Premium_Services_2- The "permitted" value for the "Premium Services II" setting within "Initiating Call Forwards/Transfers". Possible value: TRUE, FALSE -
Redirecting_Casual- The "permitted" value for the "Casual" setting within "Initiating Call Forwards/Transfers". Possible value: TRUE, FALSE -
Redirecting_URL_Dialing- The "permitted" value for the "URL Dialing" setting within "Initiating Call Forwards/Transfers". Possible value: TRUE, FALSE -
Redirecting_Unknown- The "permitted" value for the "Unknown" setting within "Initiating Call Forwards/Transfers". Possible value: TRUE, FALSE -
Redirecting_Group- The "permitted" value for the "Group" setting within "Initiating Call Forwards/Transfers". Possible value: TRUE, FALSE -
Redirected_Outside_Group- The "permitted" value for the "Outside Group" setting within "Being Forwarded/Transferred". Possible value: TRUE, FALSE -
CallMeNow_Group- The "permitted" value for the "Group" setting within "Initiating Call Forwards/Transfers". Possible value: TRUE, FALSE. Only available if "Call Me Now" service is assigned. -
CallMeNow_Local- The "permitted" value for the "Local" setting within "Initiating Call Forwards/Transfers". Possible value: TRUE, FALSE. Only available if "Call Me Now" service is assigned. -
CallMeNow_Toll_Free- The "permitted" value for the "Toll Free" setting within "Initiating Call Forwards/Transfers". Possible value: TRUE, FALSE. Only available if "Call Me Now" service is assigned. -
CallMeNow_Toll- The "permitted" value for the "Toll" setting within "Initiating Call Forwards/Transfers". Possible value: TRUE, FALSE. Only available if "Call Me Now" service is assigned. -
CallMeNow_International- The "permitted" value for the "International" setting within "Initiating Call Forwards/Transfers". Possible value: TRUE, FALSE. Only available if "Call Me Now" service is assigned. -
CallMeNow_Operator_Assisted- The "permitted" value for the "Operator Assisted" setting within "Initiating Call Forwards/Transfers". Possible value: TRUE, FALSE. Only available if "Call Me Now" service is assigned. -
CallMeNow_Chargeable_Directory_Assistance- The "permitted" value for the "Chargeable Directory Assistance" setting within "Initiating Call Forwards/Transfers". Possible value: TRUE, FALSE. Only available if "Call Me Now" service is assigned. -
CallMeNow_Special_Services_1- The "permitted" value for the "Special Services I" setting within "Initiating Call Forwards/Transfers". Possible value: TRUE, FALSE. Only available if "Call Me Now" service is assigned. -
CallMeNow_Special_Services_2- The "permitted" value for the "Special Services II" setting within "Initiating Call Forwards/Transfers". Possible value: TRUE, FALSE. Only available if "Call Me Now" service is assigned. -
CallMeNow_Premium_Services_1- The "permitted" value for the "Premium Services I" setting within "Initiating Call Forwards/Transfers". Possible value: TRUE, FALSE. Only available if "Call Me Now" service is assigned. -
CallMeNow_Premium_Services_2- The "permitted" value for the "Premium Services II" setting within "Initiating Call Forwards/Transfers". Possible value: TRUE, FALSE. Only available if "Call Me Now" service is assigned. -
CallMeNow_Casual- The "permitted" value for the "Casual" setting within "Initiating Call Forwards/Transfers". Possible value: TRUE, FALSE. Only available if "Call Me Now" service is assigned. -
CallMeNow_URL_Dialing- The "permitted" value for the "URL Dialing" setting within "Initiating Call Forwards/Transfers". Possible value: TRUE, FALSE. Only available if "Call Me Now" service is assigned. -
CallMeNow_Unknown- The "permitted" value for the "Unknown" setting within "Initiating Call Forwards/Transfers". Possible value: TRUE, FALSE. Only available if "Call Me Now" service is assigned. -
CallMeNow_Group- The "permitted" value for the "Group" setting within "Initiating Call Forwards/Transfers". Possible value: TRUE, FALSE. Only available if "Call Me Now" service is assigned.
User Registration Report
Description
The User Registrations Report provides a list of all users with a registered device in the specified entity. Can be used at the Cluster, Service Provider, and Group levels.
Columns
-
UserId- The ID of the BroadWorks User that the row relates to. -
DeviceName- The name of the registered device. -
DeviceLevel- The level of the registered device, i.e. Group, Service Provider, System -
User-Agent- The name and software version of the device client (from the device's registration request User-Agent header). -
Expiration- The registration expiry date, for dynamic registrations.
User Service Assigned Report
Description
The User Service Assigned Report details which Users within the current entity (Cluster, Service Provider, Group) have or don't have the provided service assigned. Can be used at the Cluster, Service Provider, and Group levels.
Columns
-
UserId- The ID of the BroadWorks User that the row relates to. -
GroupId- The ID of the Group that the User belongs to. -
ServiceProviderId- The ID of the Service Provider that the User belongs to. -
ServiceName- The name of the User Service that is being checked for assignment. -
Assigned- Boolean value that denotes whether the provided service is assigned. -
Enabled- Boolean value that denotes whether the provided service is enabled. Note that not all services can be enabled.
User Service Details Report
Description
The User Service Details Report provides details on what services are and are not assigned to Users within the provided entity. Can be used at the Cluster, Service Provider, and Group levels.
Columns
-
UserId- The ID of the BroadWorks User that the row relates to. -
LastName- The User's last name. -
FirstName- The User's first name. -
GroupId- The ID of the Group that the User belongs to. -
ServiceProviderId- The ID of the Service Provider that the User belongs to. -
PhoneNumber- The User's phone number. -
Extension- The User's extension. - The next columns will be the names of services and service packs assigned at the Group Level.
User Voice Portal Not Changed Report
Description
The User Voice Portal Not Changed Report details whether Users in a Group, Service Provider, or Cluster have changed their default Voice Portal Password. Can be used at the Cluster, Service Provider, and Group levels.
Columns
-
UserId- The ID of the BroadWorks User that the row relates to. -
LastName- The User's last name. -
FirstName- The User's first name. -
GroupId- The ID of the Group that the User belongs to. -
ServiceProviderId- The ID of the Service Provider that the User belongs to. -
PhoneNumber- The User's phone number. -
Extension- The User's extension. -
Voice Portal Changed- Whether the Voice Portal Passcode has been changed from the default value. -
Last Modified Date- The last time the User was modified.
Cluster Status Widgets
Cluster Status Widgets appear on the dashboard for each Cluster that you have access to.
Alert Status
The alert status will cause the border of the widget to appear a different color based on the severity of the highest non-cleared alert.
- Green - No current alerts
- Yellow - Medium severity alert active
- Red - High severity alert active
- Blue - Low severity alert active
- Grey - There is a cluster misconfiguration or the cluster is not configured for the user.
The number of unacknowledged alerts will be displayed on the right side of the status widget. Clicking this will redirect you to the Cluster's alert page.
SurgeMail Voicemail Wizard
Overview
The SurgeMail Voicemail Wizard assists in the provisioning of voicemail only Users and their configuration within BroadWorks and SurgeMail. The wizard collects the basic information as needed and performs a sequence of provisioning steps to create the user.
Procedure
The SurgeMail Voicemail Wizard can be accessed via the Tools dropdown in the header bar. Note that this will not appear if it is not licensed.
Begin by filling out the settings bar with the information desired to create the user.
- Residential / Commercial - This radio button modifies the Group ID created to prepend "r" for residential or "b" for commercial (business). Setting this to residential also enabled voice-portal auto login.
- Number - The number to be added and assigned to the User.
- Digiport - This controls which SMDI server route is used for the User.
- First Name
- Last Name
- User Limit - The User limit for the created Group. Defaults to 5.
- Web Portal Password - The initial web portal password for the user.
- Voice Portal Passcode - The initial voice portal passcode for the user.
When the settings have been entered click Create to begin the procedure.
The wizard will begin and follow the following process.
- Add the number to the Service Provider
- Create a new Group in the Service Provider
- Authorize Services
- Assign Phone Number
- Set Calling Line ID Number
- Modify Group Extension Length
- Set Group Outgoing Calling Plan
- Set Group Password Rules
- Set Group Passcode Rules
- Set Group Voice Portal Settings
- Create User
- Assign Services
- Assign Voice Portal Passcode
- Set Voice Management Options
- Set Advanced Voice Management Options
- Set Message Waiting Indicator Options
- Add Alias
- Add SMDI Route
- Create the mailbox on the SurgeMail Server
The status of the creation will appear in the status log. This is updated every 30 seconds and immediately following completion of the procedure.
Alpaca User Creation
Creates Alpaca Users from BroadWorks Admins. This task can be run from the Cluster, Service Provider, and Group levels. Note that this task resets the BroadWorks password of the Admin to a randomly generated value. All passwords will be exported to a password-protected spreadsheet once the task has completed.
Options
-
includeSystemAdmins- Creates Alpaca Users from System Admins within the selected entity. -
includeProvisoningAdmins- Creates Alpaca Users from Provisioning Admins within the selected entity. -
includeServiceProvdierAdmins- Creates Alpaca Users from Service Provider Admins within the selected entity. -
includeGroupAdmins- Creates Alpaca Users from Group Admins within the selected entity. -
includeDepartAdmins- Creates Alpaca Users from Department Admins within the selected entity. -
systemAdminRole- The Alpaca Role that will be assigned to Alpaca Users created from System Admins. -
systemProvsioningRole- The Alpaca Role that will be assigned to Alpaca Users created from Provisioning Admins. -
systemServiceProviderRole- The Alpaca Role that will be assigned to Alpaca Users created from Service Provider Admins. -
systemGroupRole- The Alpaca Role that will be assigned to Alpaca Users created from Group Admins. -
systemDepartmentRole- The Alpaca Role that will be assigned to Alpaca Users created from Department Admins. -
sendEmail- If set, once the task is complete, an email with the password-protected spreadsheet will be sent to the email address of the Alpaca User who started the task.
You will be prompted for a password for the exported spreadsheet. The password must be at least 6 characters.
Caveats
- If an Alpaca User already exists with the username or email address of a BroadWorks Admin, another will not be created.
Alpaca Command Line Interface
Introduction
The Alpaca CLI is an optional client for the Alpaca Server that provides easy access to a number of useful provisioning tools. The CLI connects via HTTPS to the server and works in tandem with the web interface to increase productivity.
Installation instructions are located here. Configuration instructions are located here.
Usage
Launch the Alpaca CLI from your terminal using ./alpaca-cli. Once Alpaca has launched, you will need to log in.
Logging In
An Alpaca User (configured in the Alpaca Web Interface) is required to log in to the CLI.
Once the application has started, use the login command to log in as an Alpaca User.
login [username] [password]
A successful login will return true and the CLI prompt.
Commands
Once logged in, the CLI command will become available.
LocationsSome CLI commands are accessible globally (from every location) others require that you be at a particular location to be able to run.
Global System Commands cd: Changes the current directory into the target location
count: Retrieves count of objects at the current location.
get: Retrieves the objects from the current location.
login: Login to the Alpaca Server
logout: Logout of the Alpaca Server
web-socket-connect: Connects to the Alpaca WebSocket.
web-socket-disconnect: Disconnects the Alpaca WebSocket.
clear: Clear the shell screen.
exit, quit: Exit the shell.
help: Display help about available commands.
script: Read and execute commands from a file.
stacktrace: Display the full stacktrace of the last error.
import-service-provider: Imports a Service Provider to the Cluster
    export-service-provider: Exports a Service Provider
    import-group: Imports a Group into the Service Provider
    migrate-service-provider: Migrates a Service Provider
   export-group: Exports a Group
   import-user: Imports a User into the Group
   migrate-group: Migrates a Group
   export-user: Exports a User
   migrate-user: Migrates a User
The help command can be used anywhere in the application. Typing help will give you a list of all commands. Note that
commands marked with an * are unavailable at your current location. Typing help <command> will provide you with
detailed information about the specific command.
Alpaca/:> help login


NAME
    login - Login to the Alpaca Server

SYNOPSYS
    login [--username] string  [--password] string

OPTIONS
    --username  string

        [Mandatory]

    --password  string

        [Mandatory]
Alpaca Connectivity
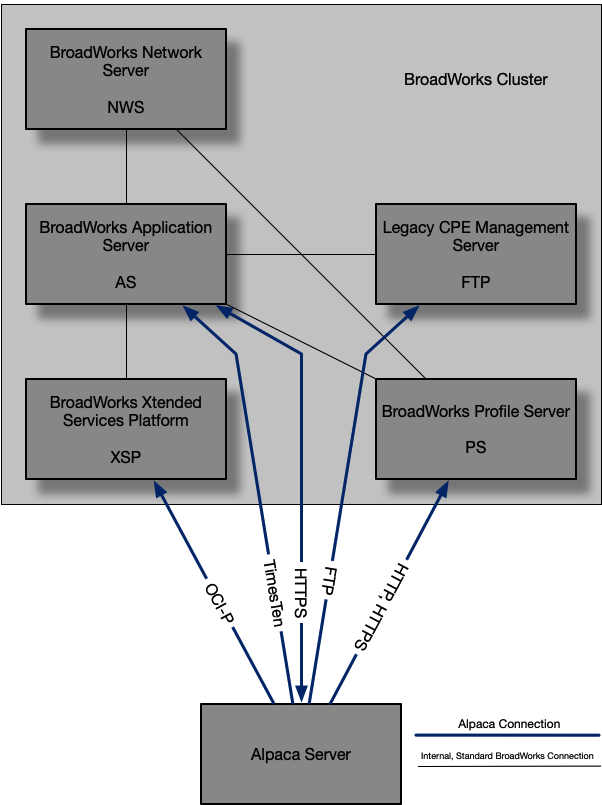
Ports
- OCI-P: 2208
- TimesTen: 11203
- HTTP: 80
- HTTPS: 443
- FTP: 20
Comprehensive Feature List
Searching
BroadWorks Objects
Header Search Field- Search for Service Providers/Enterprises from anywhere via the header search field.
- Search for Groups from anywhere via the header search field.
- Search for Users from anywhere via the header search field.
- Search for Group Access Devices from anywhere via the header search field.
- Search for Service Provider Access Devices from anywhere via the header search field.
- Search for System Admins from anywhere via the header search field.
- Search for Service Provider Admins from anywhere via the header search field.
- Search for Group Admins from anywhere via the header search field.
- Search for Department Admins from anywhere via the header search field.
- Search for Provisioning Admins from anywhere via the header search field.
- Filter BroadWorks Object searches by "Object Type".
- Filter BroadWorks Object searches by "Cluster".
- Sort search results by "Id".
- Sort search results by "Name".
- Sort search results by "Created Date".
- Sort search results by "Last Modified".
- Sort search results by "Status".
- Search for Service Providers/Enterprises within the Cluster.
- Sort search results by "Id".
- Sort search results by "Name".
- Sort search results by "isEnterprise".
- Sort search results by "Last Modified".
- Search for Administrators within the Cluster.
- Sort search results by "Id".
- Sort search results by "Name".
- Sort search results by "Type".
- Search for System Access Devices within the Cluster.
- Sort search results by "Name".
- Sort search results by "Mac Address".
- Sort search results by "Device Type".
- Search for Groups within the Service Provider/Enterprise.
- Sort search results by "Id".
- Sort search results by "Name".
- Sort search results by "User Limit".
- Sort search results by "Last Updated".
- Search for Service Provider Access Devices within the Service Provider/Enterprise.
- Sort search results by "Name".
- Sort search results by "Mac Address".
- Sort search results by "Device Type".
- Search for Users within the Group.
- Sort search results by "Id".
- Sort search results by "First Name".
- Sort search results by "Last Name".
- Sort search results by "Phone Number".
- Sort search results by "Extension".
- Sort search results by "Email".
- Sort search results by "Last Updated".
- Search for Group Access Devices within the Group.
- Sort search results by "Name".
- Sort search results by "Mac Address".
- Sort search results by "Device Type".
Audit Logs
Dashboard Level- View "Latest Changes" for all connected clusters via the Dashboard.
- Filter "Latest Changes" that contain a provided string.
- Filter "Latest Changes" by time frame - "Any".
- Filter "Latest Changes" by time frame - "This Week".
- Filter "Latest Changes" by time frame - "Last Week".
- Filter "Latest Changes" by time frame - "This Month".
- Filter "Latest Changes" by time frame - "Last Month".
- Filter "Latest Changes" by time frame - "Custom".
- Filter "Latest Changes" by Cluster.
- View the "Raw" data for an Audit Log Entry.
- View the "JSON" data for an Audit Log Entry.
- Sort search results by "Target".
- Sort search results by "Performed By".
- Sort search results by "Date".
- View "History" for Cluster.
- Filter "History" that contain a provided string.
- Filter "History" by time frame - "Any".
- Filter "History" by time frame - "This Week".
- Filter "History" by time frame - "Last Week".
- Filter "History" by time frame - "This Month".
- Filter "History" by time frame - "Last Month".
- Filter "History" by time frame - "Custom".
- View the "Raw" data for an Audit Log Entry.
- View the "JSON" data for an Audit Log Entry.
- Sort search results by "Target".
- Sort search results by "Performed By".
- Sort search results by "Date".
- View "History" for Service Provider/Enterprise.
- Filter "History" that contain a provided string.
- Filter "History" by time frame - "Any".
- Filter "History" by time frame - "This Week".
- Filter "History" by time frame - "Last Week".
- Filter "History" by time frame - "This Month".
- Filter "History" by time frame - "Last Month".
- Filter "History" by time frame - "Custom".
- View the "Raw" data for an Audit Log Entry.
- View the "JSON" data for an Audit Log Entry.
- Sort search results by "Target".
- Sort search results by "Performed By".
- Sort search results by "Date".
- View "History" for Group.
- Filter "History" that contain a provided string.
- Filter "History" by time frame - "Any".
- Filter "History" by time frame - "This Week".
- Filter "History" by time frame - "Last Week".
- Filter "History" by time frame - "This Month".
- Filter "History" by time frame - "Last Month".
- Filter "History" by time frame - "Custom".
- View the "Raw" data for an Audit Log Entry.
- View the "JSON" data for an Audit Log Entry.
- Sort search results by "Target".
- Sort search results by "Performed By".
- Sort search results by "Date".
- View "History" for User.
- Filter "History" that contain a provided string.
- Filter "History" by time frame - "Any".
- Filter "History" by time frame - "This Week".
- Filter "History" by time frame - "Last Week".
- Filter "History" by time frame - "This Month".
- Filter "History" by time frame - "Last Month".
- Filter "History" by time frame - "Custom".
- View the "Raw" data for an Audit Log Entry.
- View the "JSON" data for an Audit Log Entry.
- Sort search results by "Target".
- Sort search results by "Performed By".
- Sort search results by "Date".
Alerting
- Manage alerting system-wide or for an individual Cluster via the "Settings" tab.
- License Alerts
- Blacklist Admin Alerts
- Password Change Alerts
- Unusual Time Change Alerts
- High Volume of Change Alerts
- BroadWorks Connection Failure Alerts
- Audit Log Read Failure Alerts
- Admin Created Alerts
- Admin Deleted Alerts
- User Created Alerts
- Receive email notifications for new, cleared, and batched alerts with customizable templates.
Dashboard Features
- Monitor status of each connected BroadWorks Cluster.
- View number of available and unavailable BroadWorks Clusters.
- Run an Audit Log Detail Report.
Cluster Level Features
- Monitor License Usage with an interactive graph.
- View and acknowledge alerts.
- View number of Groups, Group Devices, Users, and Service Provider Devices.
Actions
- Import a Service Provider/Enterprise.
- Enabled Polycom Phone Services for a device type.
- Create a Voicemail User within BroadWorks and SurgeMail.
Reports
- Call Processing Call Limits Report
- Communication Barring Criteria Report
- Communication Barring Profile Report
- Device Details Report
- Emergency CLID Report
- Group Service Assigned Report
- Meet Me Conferencing Details Report
- Phone Number Report
- User Call Forwarding Always Details Report
- User Details Report
- User Migration Encumbrance Report
- User Outgoing Calling Plan Report
- User Registrations Report
- User Service Assigned Report
- User Service Details Report
- Voice Messaging Not Changed Report
Service Provider/Enterprise Level Features
Manage BroadWorks Service Provider/Enterprise Services/Settings
- Administrators
- Advice Of Charge
- Assign Domains
- Assign Network Classes of Service
- Assign Office Zones
- Assign Route Point External Systems
- Assign System Defined Communication Barring Criteria
- Assign System Defined Communication Barring Incoming Criteria
- BroadWorks Mobility
- Call Processing Policies
- Carriers
- Comm Barr Profiles
- Dial Plan Policy
- Dialable Caller ID
- Digit Pattern Criteria
- Endpoints
- Feature Access Codes
- Group Paging Targets Capacity
- Integrated IM&P
- Malicious Call Trace
- MWI Delivery to Mobile Endpoint
- Number Portability Query
- Numbers
- Profile
- Routing Profile
- Schedules
- Service Pack Usage
- Service Packs
- Services
- Session Admission Control Capacity
- Session Admission Control White List
- Trunking Call Capacity
- Voice Messaging
- Voice Portal
- Zone Calling Restrictions
- Agent Default Settings
- Agent Threshold Profiles
Actions
- Group Import
- Service Provider Export
- Service Provider Delete
- Service Provider Migration
- Service Provider Rename
- Reset Service Provider SIP Authentication
- Group Add
Reports
- Call Processing Call Limits Report
- Device Details Report
- Emergency CLID Report
- Group Service Assigned Report
- Meet Me Conferencing Details Report
- Phone Number Report
- User Call Forwarding Always Report
- User Details Report
- User Migration Encumbrance Report
- User Outgoing Calling Plan Report
- User Registrations Report
- User Service Assigned Report
- User Service Details Report
- Voice Messaging Not Changed Report
Group Level Features
- View Registration information for Devices in the Group.
Manage BroadWorks Group Services/Settings
- Acct/Auth Codes - Administration
- Acct/Auth Codes - Codes Management
- Activate Numbers
- Advice of Charge
- Agent Default Settings
- Agent Threshold Profiles
- Agent Unavailable Codes
- Assign Domains
- Assign Enterprise Trunk Number Prefixes
- Assign Enterprise Trunk Number Ranges
- Assign Group Services
- Assign Network Classes of Service
- Assign Numbers
- Assign Office Zones
- Assign Route Point External Systems
- Auto Attendant
- BroadWorks Anywhere
- Call Capacity
- Call Centers
- Call Disposition Codes
- Call Park
- Call Pickup
- Call Processing Policies
- Call Recording Platform
- Collaborate Bridges
- Communication Barring - Profiles
- Communication Barring Authorization Codes
- Departments
- Device Configuration
- Device Management Event Queues
- Dial Plan Policy
- Dialable Caller ID
- Enterprise Trunk
- Exchange Integration
- Existing User Services
- Find-me/Follow-me
- Flexible Seating Host
- Group Night Forwarding
- Group Paging
- Group Paging Targets Capacity
- Group Web Policies
- Hunt Group
- IMRNs
- Incoming Calling Plan
- Instant Group Call
- Integrated IM&P
- Intercept Group
- Meet-Me Conference Bridges
- Meet-Me Conference Ports
- Mobile Subscriber Directory Numbers
- Music/Video On Hold
- MWI Delivery to Mobile Endpoint
- New User Services Template
- Outgoing Calling Plan
- Outgoing Digit Plan
- Outgoing Pinhole Digit Plan
- Passcode Rules
- Password Rules
- Pinhole Digit Strings
- Polycom Phone Services
- Pre-Alerting Announcement
- Preferred Carrier Group
- Profile
- Routing Policy Settings
- Routing Profile
- Schedules
- Services
- Session Admission Control Capacity
- Session Admission Control Group
- Third-Party Voice Mail Support
- Transfer Numbers
- Trunk Group
- Trunking Call Capacity
- Virtual On-Net Users
- Voice Messaging
- Voice Portal
- Voice XML
Actions
- Group Migration
- User Import
- Group Export
- Group Delete
- User Collection Migration
- Group to Enterprise Migration
- Bulk Provisioning
- Bulk User Delete
- Reset Group SIP Authentication
- User Add
Reports
- Call Processing Call Limits Report
- Device Details Report
- Group Service Assigned Report
- Meet Me Conferencing Details Report
- Phone Number Report
- User Call Forwarding Always Report
- User Details Report
- User Migration Encumbrances Report
- User Outgoing Calling Plan Report
- User Registrations Report
- User Service Assigned Report
- User Service Details Report
- Voice Messaging Not Changed Report
Auto Attendant Level Features
Manage Auto Attendant Services/Settings
- Addresses
- After Hours Menu
- Aliases
- Alternate Numbers
- Announcement Repository
- Anonymous Call Rejection
- Assign Services
- Basic Call Logs
- Business Hours Menu
- Call Application Policies
- Call Forwarding Always
- Call Forwarding Always Busy
- Call Forwarding Always Secondary
- Call Forwarding Always Selective
- Call Me Now
- Call Notify
- Call Policies
- Call Recording
- Calling Line ID Delivery Blocking
- Charge Number
- Communication Barring User-Control
- Connected Line Identification Restriction
- Custom Ringback User / Video
- Distribution Lists
- Diversion Inhibitor
- Do Not Disturb
- Enhanced Call Logs
- External Custom Ringback
- Fax Messaging
- Feature Access Codes
- Greetings
- Group Night Forwarding
- Holiday Menu
- Incoming Calling Plan
- Outgoing Authorization Codes
- Outgoing Calling Plan
- Outgoing Digit Plan
- Outgoing MWI
- Outgoing Pinhole Digit Plan
- Voice Portal Passcode
- Pre-Alerting Announcement
- Priority Alert
- Privacy
- Profile
- Selective Call Acceptance
- Selective Call Rejection
- Submenus
- Third-Party Voice Mail Support
- Transfer Numbers
- Voice Messaging User / Video
- Voice Portal
- Zone Calling Restrictions
Hunt Group Level Features
Manage Hunt Group Services/Settings
- Addresses
- Aliases
- Alternate Numbers
- Announcement Repository
- Anonymous Call Rejection
- Assign Services
- Basic Call Logs
- Call Application Policies
- Call Forwarding Always
- Call Forwarding Always Busy
- Call Forwarding Always Secondary
- Call Forwarding Always Selective
- Call Me Now
- Call Notify
- Call Policies
- Calling Line ID Delivery Blocking
- Calling Name Retrieval
- Charge Number
- Communication Barring User-Control
- Connected Line Identification Restriction
- Custom Ringback User / Video
- Directory Number Hunting
- Distribution Lists
- Diversion Inhibitor
- Do Not Disturb
- Enhanced Call Logs
- External Custom Ringback
- Fax Messaging
- Feature Access Codes
- Greetings
- Group Night Forwarding
- Incoming Calling Plan
- Outgoing Authorization Codes
- Outgoing Calling Plan
- Outgoing Digit Plan
- Outgoing MWI
- Outgoing Pinhole Digit Plan
- Voice Portal Passcode
- Pre-Alerting Announcement
- Priority Alert
- Privacy
- Profile
- Selective Call Acceptance
- Selective Call Rejection
- SMDI Message Desk
- Third-Party Voice Mail Support
- Transfer Numbers
- Voice Messaging User / Video
- Voice Portal
- Zone Calling Restrictions
Call Center Level Features
Manage Call Center Services/Settings
- Addresses
- Agents
- Aliases
- Alternate Numbers
- Announcement Repository
- Announcements
- Anonymous Call Rejection
- Assign Services
- Basic Call Logs
- Bounced Calls
- Call Application Policies
- Call Disposition Codes
- Call Forwarding Always
- Call Forwarding Always Busy
- Call Forwarding Always Secondary
- Call Forwarding Always Selective
- Call Me Now
- Call Notify
- Call Policies
- Call Recording
- Calling Line ID Delivery Blocking
- Calling Name Retrieval
- Charge Number
- Comfort Message Bypass
- Communication Barring User-Control
- Connected Line Identification Restriction
- Custom Ringback User/Video
- Directory Number Hunting
- Distinctive Ringing
- Distribution List
- Diversion Inhibitor
- DNIS
- Do Not Disturb
- Enhanced Call Logs
- External Custom Ringback
- Fax Messaging
- Feature Access Codes
- Forced Forwarding
- Greetings
- Group Night Forwarding
- Holiday Service
- Incoming Calling Plan
- Night Service
- Outgoing Authorization Codes
- Outgoing Calling Plan
- Outgoing Digit Plan
- Outgoing MWI
- Outgoing Pinhole Digit Plan
- Overflow
- Pre-Alerting Announcement
- Priority Alert
- Privacy
- Profile
- Queue Status Notification
- Selective Call Acceptance
- Selective Call Rejection
- Stranded Calls
- Status & Statistics
- Stranded Calls - Unavailable
- Supervisors
- Third-Party Voice Mail Support
- Thresholds
- Transfer Numbers
- Virtual On-Net Enterprise Extensions
- Voice Messaging User / Video
- Voice Portal
- Zone Calling Restrictions
- Voice Portal Passcode
- Web Access Password
Trunk Group Level Features
Manage Trunk Group Settings
- Profile
- Call Forwarding Always
- Capacity Management
- Stateful Trunk Group Rerouting
- Unreachable Destination
- Trunk Group User Creation
- Registrations
- Security Classification
Meet Me Conference Bridge Level Features
Manage Meet Me Conference Bridge Services/Settings
- Addresses
- Aliases
- Alternate Numbers
- Announcement Repository
- Anonymous Call Rejection
- Assign Services
- Call Application Policies
- Call Forwarding Always
- Call Forwarding Always Busy
- Call Forwarding Always Secondary
- Call Forwarding Always Selective
- Call Notify
- Call Policies
- Call Transfer
- Calling Line ID Delivery Blocking
- Calling Name Retrieval
- Calling Party Category
- Charge Number
- Classmark
- Communication Barring Authorization Codes
- Communication Barring User-Control
- Connected Line Identification Restriction
- Distribution Lists
- Diversion Inhibitor
- Do Not Disturb
- Fax Messaging
- Feature Access Codes
- Greetings
- Group Night Forwarding
- Incoming Calling Plan
- Outgoing Authorization Codes
- Outgoing Calling Plan
- Outgoing Digit Plan
- Outgoing MWI
- Outgoing Pinhole Digit Plan
- Password
- Pre-Alerting Announcement
- Privacy
- Profile
- Selective Call Acceptance
- Selective Call Rejection
- Third-Party Voice Mail Support
- Transfer Numbers
- Voice Messaging User / Video
- Voice Portal
- Zone Calling Restrictions
BroadWorks Anywhere Portal Level Features
Manage BroadWorks Anywhere Portal Services/Settings
- Addresses
- Aliases
- Alternate Numbers
- Announcement Repository
- Anonymous Call Rejection
- Assign Services
- Basic Call Logs
- Call Application Policies
- Call Forwarding Always
- Call Forwarding Always Secondary
- Call Forwarding Busy
- Call Forwarding Selective
- Call Me Now
- Call Notify
- Call Policies
- Calling Line ID Delivery Blocking
- Charge Number
- Communication Barring User-Control
- Connected Line Identification Restrictions
- Custom Ringback User/Video
- Distribution Lists
- Diversion Inhibitor
- Do Not Disturb
- Enhanced Call Logs
- External Custom Ringback
- Fax Messaging
- Feature Access Codes
- Greetings
- Group Night Forwarding
- Incoming Calling Plan
- Outgoing Authorization Codes
- Outgoing Calling Plan
- Outgoing Digit Plan
- Outgoing MWI
- Outgoing Pinhole Digit Plan
- Pre-alerting Announcement
- Priority Alert
- Privacy
- Profile
- Selective Call Acceptance
- Selective Call Rejection
- Third-Party Voice Mail Support
- Transfer Numbers
- Voice Messaging User/Video
- Zone Calling Restrictions
Group Paging Level Features
Manage Group Paging Services/Settings
- Addresses
- Announcement Repository
- Assign Services
- Call Application Policies
- Call Forwarding Always Secondary
- Call Notify
- Call Policies
- Charge Number
- Communication Barring User-Control
- Custom Ringback User
- Feature Access Codes
- Group Night Forwarding
- Line ID Blocking
- Originators
- Pre-Alerting Announcement
- Privacy
- Profile
- Selective Acceptance
- Selective Rejection
- Targets
Find-Me/Follow-Me Level Features
Manage Find-Me/Follow-Me Services/Settings
- Addresses
- Alerting Groups
- Aliases
- Alternate Numbers
- Announcement Repository
- Anonymous Call Rejection
- Assign Services
- Call Application Policies
- Call Forwarding Always
- Call Forwarding Always Busy
- Call Forwarding Not Reachable
- Call Forwarding Secondary
- Call Forwarding Selective
- Call Me Now
- Call Notify
- Call Policies
- Calling Line ID Delivery Blocking
- Charge Number
- Communication Barring Authorization Codes
- Communication Barring User-Control
- Connected Line Identification Restriction
- Custom Ringback User
- Distribution Lists
- Diversion Inhibitor
- Do Not Disturb
- External Ringback User
- Feature Access Codes
- Greetings
- Group Night Forwarding
- Incoming Calling Plan
- Outgoing Authorization Codes
- Outgoing Calling Plan
- Outgoing Digit Plan
- Outgoing MWI
- Outgoing Pinhole Digit Plan
- Password
- Pre-Alerting Announcement
- Privacy
- Profile
- Selective Call Acceptance
- Selective Call Rejection
- Third-Party Voice Mail Support
- Transfer Numbers
- Voice Messaging User / Video
- Voice Portal
- Zone Calling Restrictions
Instant Group Call Level Features
Manage Instant Group Call Services/Settings
- Addresses
- Aliases
- Alternate Numbers
- Announcement Repository
- Anonymous Rejection
- Assign Services
- Call Application Policies
- Call Forwarding Always
- Call Forwarding Always Secondary
- Call Forwarding Busy
- Call Forwarding Selective
- Call Me Now
- Call Notify
- Call Policies
- Charge Number
- Communication Barring User-Control
- Connected Line Identification Restriction
- Custom Ringback User
- Distribution Lists
- Diversion Inhibitor
- Do Not Disturb
- External Custom Ringback
- Fax Messaging
- Feature Access Codes
- Greetings
- Group Night Forwarding
- Incoming Calling Plan
- Line ID Blocking
- Outgoing Authorization Codes
- Outgoing Calling Plan
- Outgoing Digit Plan
- Outgoing MWI
- Outgoing Pinhole Digit Plan
- Password
- Pre-Alerting Announcement
- Priority Alert
- Privacy
- Profile
- Selective Acceptance
- Selective Rejection
- Third-Party Voice Mail Support
- Transfer Numbers
- Voice Management
- Voice Portal
- Zone Calling Restrictions
Flexible Seating Host Level Features
Manage Flexible Seating Host Services/Settings
- Addresses
- Assign Services
- Authentication
- Basic Call Logs
- Call Application Policies
- Call Policies
- Charge Number
- Enhanced Call Logs
- Guest Association
- Line ID Blocking
- Privacy
- Profile
- Routing Policies
Access Device Level Features
Manage Access Device Services/Settings
- Custom Tags
- Files
- Profile
- Tag Set
Actions
- Access Device Migration
- Access Device Tag Compressor
User Level Features
Manage BroadWorks User Services/Settings
- Addresses
- Advice Of Charge
- Aliases
- Alternate Numbers
- Alternate User Ids
- Announcement Repository
- Anonymous Call Rejection
- Assign Call Centers
- Route Point Supervisors
- Assign Services
- Authentication
- Automatic Callback
- Automatic Hold/Retrieve
- Barge-in Exempt
- Basic Call Logs
- Bridges
- BroadWorks Agent
- BroadWorks Anywhere
- BroadWorks Mobility
- BroadWorks Receptionist - Enterprise
- BroadWorks Receptionist - Office
- BroadWorks Receptionist - Small Business
- BroadWorks Supervisor
- Business Communicator Desktop
- Business Communicator Desktop - Audio
- Business Communicator Desktop - Video
- Business Communicator Mobile
- Business Communicator Mobile - Audio
- Business Communicator Mobile - Video
- Business Communicator Tablet
- Business Communicator Tablet - Audio
- Business Communicator Tablet - Video
- Busy Lamp Field
- Call Application Policies
- Call Centers
- Call Forwarding Always
- Call Forwarding Always Secondary
- Call Forwarding Busy
- Call Forwarding No Answer
- Call Forwarding Not Reachable
- Call Forwarding Selective
- Call Me Now
- Call Notify
- Call Policies
- Call Processing Policies
- Call Recording
- Call Return
- Call Transfer
- Call Waiting
- Calling Line ID Blocking Override
- Calling Line ID Delivery Blocking
- Calling Name Delivery
- Calling Name Retrieval
- Calling Party Category
- Charge Number
- Classmark
- Client License 15 (BroadWorks IBM Sametime Connector)
- Client License 16 (UC-Connect Client License)
- Client License 3 (BroadWorks AssistantEnterprise)
- Collaborate - Sharing
- Collaborate Rooms
- CommPilot Express
- Communication Barring Authorization Codes
- Communication Barring User-Control
- Conference Room
- Conferences
- Connected Line Identification Restriction
- Custom Ringback User
- Customer Originated Trace
- Device Policies
- Direct Route
- Directed Call Pickup
- Directed Call Pickup with Barge-in
- Distribution Lists
- Diversion Inhibitor
- Do Not Disturb
- Enhanced Call Logs
- Executive
- Executive-Assistant
- External Calling Line ID Delivery
- External Custom Ringback
- Fax Messaging
- Feature Access Codes
- Flash Call Hold
- Flexible Seating Guest
- Greetings
- Group Directory
- Group Night Forwarding
- Hoteling Guest
- Hoteling Host
- In-Call Service Activation
- Incoming Calling Plan
- Integrated IM&P
- Intercept User
- Internal Calling Line ID Delivery
- Last Number Redial
- Meet Me Recordings
- MobileLink
- Music/Video On Hold
- MWI Delivery to Mobile Endpoint
- N-Way Call
- Number Portability Announcement
- Office Communicator Tab
- Office Zone
- Outgoing Authorization Codes
- Outgoing Calling Plan
- Outgoing Digit Plan
- Outgoing MWI
- Outgoing Pinhole Digit Plan
- Personal Phone List
- Physical Location
- Polycom Phone Services
- Pre-Alerting Announcement
- Preferred Carrier User
- Prepaid
- Priority Alert
- Privacy
- Profile
- Push Notification Registrations
- Push to Talk
- Remote Office
- Route List
- Schedules
- Security Classification
- Selective Acceptance
- Selective Rejection
- Sequential Ring
- Shared Call Appearance
- Silent Alerting
- Simultaneous Ring Personal
- Speed Dial 100
- Speed Dial 8
- Third-Party MWI Control
- Third-Party Voice Mail Support
- Three-Way Call
- Transfer Numbers
- Two-Stage Dialing
- Video Add-On
- Voice Management
- Voice Portal
- Voice Portal Calling
- Voice Portal Passcode
- Web Access Password
- Zone Calling Restrictions
Actions
- Delete Voicemail User
- Reset Email Password
- User Export
- User Delete
- User Migration
- Reset User SIP Authentication
- Reset User Passwords
- User Replace
- Enable Cisco Soft Client
Task Level Features
- View Running/Queued/Recent/Recurring Tasks
- Pause/Resume Task Manager
- Search through Task History
- Filter by status - "All".
- Filter by status - "Running".
- Filter by status - "Initializing".
- Filter by status - "Queued".
- Filter by status - "Paused".
- Filter by status - "Stopped".
- Filter by status - "Cancelled".
- Filter by status - "Finished".
- Sort by "Status".
- Sort by "Name".
- Sort by "Created Date".
- Sort by "Scheduled Date".
- Sort by "Completed Date".
- Sort by "Progress".
Individual Task Features
- View the status of task and percentage complete.
- View started time, created by, and location information.
- View task logs.
- Download task logs.
- Download task attachments (Reports, Exports, etc.)
Admin Level Features
Alpaca Users
- View current users.
- Sort by "Username".
- Sort by "Name".
- Sort by "Email".
- Sort by "Alpaca Role".
- Sort by "Last Modified Date".
- Edit users.
- Delete users.
BroadWorks Clusters
- View clusters.
- Edit clusters.
- Delete clusters.
Alpaca Roles
- View roles.
- Add roles.
- Edit roles.
- Delete roles.
System Metrics
- View JVM metrics.
- View HTTP request metrics.
- View Service statistics.
Account Level Features
- Update account information.
- Reset password.
- Add BroadWorks credentials.
- Remove BroadWorks credentials.
- Update BroadWorks credentials.
Exported Data
Service Provider / Enterprise Shared Data
- List of Activatable Features for the system.
- Information objects for all Service Provider Access Devices within the Service Provider.
- List of announcement files used by the Service Provider. *
- List containing all the ids of Groups in the Service Provider.
- Information objects for all Groups within the Service Provider.
- List containing all the ids of Admins within the Service Provider.
- Mapping of Admin ids to their detailed data.
- Mapping of Admin ids to their login information. **
- Mapping of Admin ids to their policy details.
- Service Provider Answer confirmation details.
- Call Processing Policy details.
- Preferred Carrier details.
- Communication Barring Assigned Criteria list.
- Communication Barring Assigned Incoming Criteria list.
- Communication Barring Profile list.
- Mapping of Communication Barring Profile name to profile details.
- Communication Barring Digit Pattern Criteria list.
- Mapping of Communication Barring Digit Pattern Criteria name to digit pattern details.
- Device Profile Authentication Password Rules.
- Dialable Caller ID details.
- Dialable Caller ID Criteria details.
- Dial Plan Policy details.
- Dial Plan Policy Access Code list.
- Digit Collection details.
- List of all DNs within the Service Provider.
- List of domains assigned to the Service Provider.
- Enhanced Call Logs details.
- Feature Access Code details.
- List of File Repository Users. **
- Mapping of File Repository User id to password. **
- Group Paging Targets Capacity details.
- IMRN details.
- Integrated IM&P Password. **
- Meet Me Conferencing details.
- Mapping of Mobile Subscriber Directory Numbers to Network.
- List of Network Class of Services assigned to the Service Provider.
- Number Portability Query details.
- List of Office Zones assigned to the Service Provider.
- Voice Portal Passcode Rules.
- Web Portal Password Rules.
- SIP Authentication Password Rules.
- Route Point External System list.
- Routing Profile details.
- List of Schedules.
- Mapping of Schedules to their events.
- System Licensing detail.
- Service Authorization details.
- List of Service Packs within the Service Provider.
- Service Provider Service settings.
- Session Admission Control Capacity details.
- Session Admission Control Whitelist details.
- System TimeZone list.
- Language list.
- Application Server Set details.
- Voice Portal Branding details.
- System Password Rules.
- System Passcode Rules.
Enterprise Only Data
- Enterprise Service Settings.
- Enterprise Announcement List. **
- Call Center Agent Default settings.
- Call Center Agent Threshold Profile list.
- Call Center Agent Unavailable Code list.
- Call Center Agent Unavailable Code settings.
- Call Center Call Disposition Code list.
- Call Center Routing Policy details.
- Call Center Enhanced Reporting details.
- Call Center Enhanced Reporting Report Template list.
- Call Center Enhanced Reporting Scheduled Report list.
- Common Phone list.
- List of Enterprise departments.
- Voice VPN details.
- Voice VPN Policy list.
- Session Admission Control Group list.
- Communication Barring Authorization Code list.
Group Data
- Information objects for all Group Access Devices within the Group.
- List containing the ids of all the Users within the Group.
- Information objects for all Users within the Group.
- List of Pilot Users.
- Group Service details.
- Group User Service details.
- Information objects for all Auto Attendants within the Group.
- Information objects for all Find Me/Follow Me instances within the Group.
- Information objects for all Meet Me Conference Bridges within the Group.
- Information objects for all Voice XML instances within the Group.
- Information objects for all BroadWorks Anywhere Portals within the Group.
- Information objects for all Collaborate Bridges within the Group.
- Information objects for all Flexible Seating Hosts within the Group.
- Information objects for all Group Paging instances within the Group.
- Information objects for all Instant Group Call instances within the Group.
- Information objects for all Hunt Groups within the Group.
- Information objects for all Route Point instances within the Group.
- Information objects for all Call Centers within the Group.
- Meet Me Conferencing settings.
- Call Center Agent Default settings.
- Call Center Routing Policy details.
- Call Center Call Disposition Code list.
- Call Center Enhanced Reporting Branding details.
- Call Center Enhanced Reporting details.
- Call Center Enhanced Reporting Report Template list.
- Call Center Enhanced Reporting Scheduled Report list.
- Call Center Agent Unavailable Code list.
- Call Center Agent Unavailable Code settings.
- Mapping of the count of each Service Instance type within the Group.
- Announcement files. *
- Dialable Caller ID details.
- Dialable Caller ID Criteria list.
- List of admins within the Group.
- Mapping of Admin ids to their detailed data.
- Mapping of Admin ids to their login information. **
- Mapping of Admin ids to their policy details.
- BroadWorks Mobile Manager details.
- BroadWorks Mobile Manager Domain list.
- BroadWorks Mobile Manager Home Zone list.
- Call Processing Policy details.
- Common Phone List details.
- Communication Barring settings.
- Communication Barring Authorization Code list.
- Communication Barring Profile list.
- Custom Contact Directory list.
- List of Group Departments.
- Mapping of Department Key to Department details.
- Mapping of Department Key to Department Admin list.
- Mapping of Department Admin to login information, **
- List of Device Types used within the Group.
- Mapping of Device Type to Custom Tags.
- Mapping of Device File to Device File details.
- Dial Plan Policy details.
- Dial Plan Policy Access Code list.
- Digit Collection details.
- List of DNs used within the Group.
- List of DNs and their activation status.
- List of DNs and their assignment status.
- List of domains assigned to the Group.
- List of endpoints within the Group.
- Exchange Integration details.
- Exchange Integration Password.
- Extension Length details.
- Feature Access Code details.
- Group Paging Targets Capacity settings.
- IMRN details.
- BroadWorks Mobility Mobile Subscriber Directory Number list.
- List of assigned Network Class of Service.
- Number Activation Mode.
- List of Office Zones.
- Mapping of Department to Outgoing Calling Plan Auth Codes.
- Group Outgoing Calling Plan Auth Codes.
- Voice Portal Passcode Rules.
- Web Portal Password Rules.
- Group Policy details.
- Route Point External System list.
- Routing Profile details.
- List of Schedules.
- Map of Schedules to Schedule Events.
- Session Admission Control details.
- Session Admission Control Group list.
- Trunk Group Password map. **
- Group Voice Portal credentials. **
BroadWorks User Shared Data (Users and Service Instances)
- User Service details.
- User Group Service settings.
- Announcement list. *
- User Call Policy details.
- Authentication Information. **
- User Communication Barring details.
- Feature Access Code details.
- List of DNs used by the User.
User Only Data
- Primary Device details.
- Information objects for all Devices used by the User.
- Mapping of Devices to Additional Type (SCA, Music On Hold, etc).
- Registration list.
- Busy Lamp Field Monitoring Map.
- Primary Endpoint Advanced settings.
- User Schedule details.
- Mapping of Schedules to Events.
- Call Processing Policy details.
- Communication Barring settings.
- Device Policy details.
- Personal Phone list.
- Meet Me Conferencing Conference list.
- Mapping of Conference to Delegate list.
- Mapping of Conference to Conference details.
- Mapping of Conference to Greeting details.
- Mapping of Conference to Access information. **
- Call Center settings.
- Call Center thin client settings.
- BroadWorks Anywhere settings.
- BroadWorks Anywhere Phone Number list.
- BroadWorks Anywhere Selective Criteria map.
- Flexible Seating Guest details.
- Collaborate Instant Room Parameters details.
- Collaborate Instant Room list.
- Collaborate Project Room list.
- Collaborate My Room details.
- Receptionist thin client settings.
Auto Attendant Only Data
- Submenu Usage list.
- Submenu list.
Find Me / Follow Me Only Data
- Alerting Group list.
- Alerting Group Selective Criteria list.
Collaborate Bridge Only Data
- Voice Portal details.
Flexible Seating Host Only Data
- Routing policy details.
- Guest Association details.
Group Paging Only Data
- Originator list.
- Target list.
Route Point Only Data
- Bounced Call details.
- Distinctive Ringing details.
- Announcement settings.
- Fail Over Policy details.
- Forced Forwarding details.
- Holiday Service details.
- Night Service details.
- Overflow settings.
- Call Disposition Code list.
- Call Disposition Code settings.
- DNIS settings.
- DNIS list.
- Mapping of DNIS to Announcement.
- Mapping of DNIS to Agent.
Call Center Only Data
- Agent list.
- Announcement settings.
- Distinctive Ringing details.
- Statistics Reporting settings.
- Supervisor list.
- Map of Supervisor to Agent list.
- Holiday Service details.
- Night Service details.
- Overflow settings.
- Stranded Call settings.
- Stranded Call Unavailable settings.
- Bounced Call details.
- Comfort Message Bypass details.
- Forced Forwarding details.
- Queue Status Notification settings.
- Queue Call Disposition Code list.
- Queue Call Disposition Code settings.
- DNIS list.
- Mapping of DNIS to Announcement.
- Mapping of DNIS to Agent.
Access Device Data (System, Service Provider and Group)
- Custom Credentials. **
- List of Users on the device.
- List of Device Files.
- Custom Tag information.
* Information pulled from Profile Server.
** Information pulled from TimesTen.