RedHat/CentOS 7/8 Alpaca Highly Available Clustering Setup
This guide prepares each Alpaca component to be setup as a cluster. Each individual component can be setup to be highly available as registering nodes.
Assumptions
- Credentials to access the Alpaca servers as root.
- Working knowledge of
sshand file transfer tool such asscp. - Each Alpaca instance should have a resolvable name to a private IP address that is accessible from the other instances.
- Alpaca is configured to use an Amazon S3 bucket as it's file store. This is required for all Alpaca Server instances to store and retrieve files in a distributed way. If this is not completed downloads and logs for tasks will be incomplete and potentially unretrievable.
Configurations
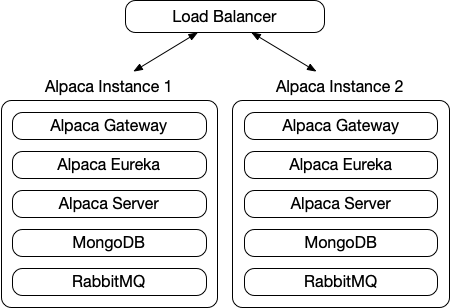
- Each server instance can host the complete set of processes required to create a clustered Alpaca setup. The below image is an example of such a setup.
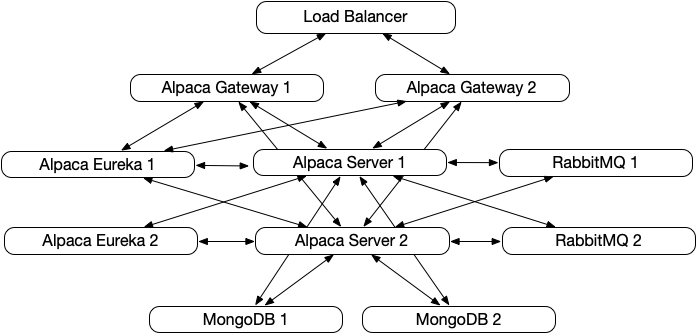
- The individual components can also be separated on separate machines or virtual machines. This configuration allows any piece to be hosted separately. The below image shows the connections between the various pieces as separated.
Steps
RabbitMQ
- Please reference the official guides for troubleshooting.
- Ensure the /etc/hostname and /etc/hosts file has all nodes listed.
- Ensure that the Erlang Cookie file is updated on all nodes to be identical.
-
Ensure that the RabbitMQ nodename is correctly setup. This can be accomplished by creating a
/etc/rabbitmq/rabbitmq-env.conffile and specifying the correct environment variable. After adding this file you will need to restart RabbitMQ withservice rabbitmq-server restart. An example of this file is below.NODENAME=rabbit@alpaca-2 NODE_IP_ADDRESS=10.10.0.254 NODE_PORT=5672 HOME=/var/lib/rabbitmq LOG_BASE=/var/log/rabbitmq MNESIA_BASE=/var/lib/rabbitmq/mnesia -
Enable clustering by turning off RabbitMQ and connecting it to one of the other servers in the cluster.
rabbitmqctl stop_app # => Stopping node rabbit@alpaca-2 ...done. rabbitmqctl reset # => Resetting node rabbit@alpaca-2 ... rabbitmqctl join_cluster rabbit@alpaca-1 # => Clustering node rabbit@alpaca-2 with [rabbit@alpaca-1] ...done. rabbitmqctl start_app # => Starting node rabbit@alpaca-2 ...done. -
Ensure that all queues are in HA mode. This should be run on the existing Rabbit MQ server. Although it can be ran from any node after an Alpaca Server has been started.
rabbitmqctl set_policy HA '^(?!amq\.).*' '{"ha-mode": "all"}'
-
Update
application-prod.ymlfor each Alpaca Server configuration.- Remove
hostfield. -
Replace with comma separated
addressesfield.spring: rabbitmq: addresses: alpaca-2.lab.ecg.co:5672,alpaca-1.lab.ecg.co:5672
- Remove
MongoDB
- Please note that in order for MongoDB to perform HA failover it requires more than 2 nodes with preferably an odd number to allow consensus voting of the new primary. In a pair failover will not occur seamlessly.
-
Update
/etc/mongod.confto bind to an external IP address on each Mongo instance.net: port: 27017 bindIp: 0.0.0.0 -
Update
/etc/mongod.confto assign the same replicate set name to each Mongo instance.replication: replSetName: "alpaca-set" After updating the Mongo configuration restart the service using
service mongod restart.-
Enable replica sets by running the following command in the Mongo terminal listing all Mongo instance.
rs.initiate({_id:'alpaca-set',members:[{_id:0,host:"alpaca-1.lab.ecg.co:27017"},{_id:1,host:"alpaca-2.lab.ecg.co:27017"}]}) -
If you are adding a new Mongo instance to an existing replica set you must connect to the current primary instance and issue the rs.add() command instead.
rs.add({ host: "alpaca-3.lab.ecg.co:27017" })
-
Update the
/etc/alpaca/server/config/application-prod.ymlfile to include each mongo instance in its pool of available databases.spring: data: mongodb: uri: mongodb://alpaca-1.lab.ecg.co:27017,alpaca-2.lab.ecg.co:27017 Follow the official replica set documentation for additional troubleshooting.
Eureka
- Update the
/etc/alpaca/eureka/config/application-prod.ymlfile to have each instance register with the additional nodes. This list is command separated to list all additional nodes. The below example is for two nodes. The additional nodes flag is just there for an example of adding more than 2. -
Server 1:
eureka: instance: hostname: alpaca-1.lab.ecg.co client: serviceUrl: defaultZone: http://alpaca-2.lab.ecg.co:8761/eureka,<additional nodes> -
Server 2:
eureka:
  instance:
    hostname: alpaca-2.lab.ecg.co
  client:
    serviceUrl:
      defaultZone: http://alpaca-1.lab.ecg.co:8761/eureka,<additional nodes>
Gateway
-
Update the
/etc/alpaca/gateway/config/application-prod.ymlfile to have each instance register will all appropriate Eureka nodes. This is the complete list of Eureka instances similar to the Eureka configuration. The below example is for two nodes.eureka: client: service-url: defaultZone: http://alpaca-1.lab.ecg.co:8761/eureka,http://alpaca-2.lab.ecg.co:8761/eureka
Server
-
The server requires configuration elements for all of the other nodes. Verify that the Eureka, Mongo, and RabbitMQ configuration fields are all setup to list their various nodes. In addition, each server must have a unique ID set. See below for a sample clustered configuration.
eureka:
  instance:
    metadata-map:
      id: server-r22-2
  client:
    service-url:
      defaultZone: http://alpaca-2.lab.ecg.co:8761/eureka,http://alpaca-1.lab.ecg.co:8761/eureka
spring:
  rabbitmq:
    addresses: alpaca-2.lab.ecg.co:5672,alpaca-1.lab.ecg.co:5672
  data:
    mongodb:
      uri: mongodb://alpaca-1.lab.ecg.co:27017,alpaca-2.lab.ecg.co:27017